Wednesday, August 22, 2012

Format USB Disk in DOS

Many times people ask this question "I can't format my USB or Flash Drive in Windows, how to I format my USB or 16GB USB or Flash Memory or Memory Card or SD Card in MS DOS or DOS"
If you find this question answer, then you come on correct place and follow these step, very simple.

Step 1: Insert your USB or Flash Memory in computer.
Step 2: Double click on My Computer icon at Desktop
Step 3: Note the USB or Removable Disk Portion name and Letter (i.e Memory Card (H)).
Step 4: Click on Start menu button > Run and type "cmd" press Enter keyboard button.
Step 5: Now you see a black window called DOS Promote.
Step 6: Type this command "format H:" and press Enter keyboard key. H is your USB driver name latter, it depend upon your computer.
Step 7: When you press Enter key, computer ask you question in yes or no (Y/N), you must type Y and press Enter key.

Now Format process is start and percentage increase continually, when it become to 100%, it mean your USB drive completely formatted.
For more detail watch this video.


If you have any suggestion or any question, please give comments in below comments form.
We respect your suggestion and waiting for your response.

Reference: ThinkBeyondWindow

Saturday, August 18, 2012

Google Tips "zerg rush"

First of all open Google Search Engine website www.google.com
In Google search box type "zerg rush" and press enter key.
Now see the magic of Google as below image.


Finally, it become like following image.


If you like this Google Tip then give your comments as feedback.


Monday, August 6, 2012

How to Save Word 2007 file in Word 2003

Many time we send ms office files through Email or USB but some time other user complain that, it is not working or not open in my computer, the actual problem is that, you use new version of ms office like 2010 or 2007 and other user use old version like ms office 2003.
In this video tutorial you learn how to save ms office 2010 or ms office 2007 files in old version office like ms office 2003.
So watch this video carefully.

Friday, August 3, 2012

How to Upload pictures / photos in Facebook

Facebook is a world largest social network. Mostly Facebook users upload photos and share with friends.
Now I show you step by step, how you upload your photos in your Facebook profile.
Follow these steps.
Step 1: Login in your Facebook account.(for login click here)
Step 2: After Login, Click  Add Photo/Video at the top of your home page.
Step 3: Click on Create Photo Album as you see in above picture.
Step 4: Now a a windows is open, Select the image files you want to upload. To select multiple photos at once, hold down the Control (Ctrl) button on your Keyboard, or the Command button on your Mac, while clicking the image files.

Step 5: Now your Album start the Photo Uploading in Facebook, While your photos are uploading, 
Write an album title and description. 
Use the audience selector to choose who can see the album (Note: If you tag people, their friends will be able to see the pictures they’re tagged in).
Add captions, tags, and locations to photos as each one finishes uploading
Step 6: Check the progress bar at bottom to see the estimated remaining time for your album upload. When it's complete, click Post Photos.
Congratulation, you successfully upload your photos in Facebook profile, now you can share this album with any one or specific peoples if you want.

If you have any idea or any problem then give comments in following comments form. we respect your comments.

Thursday, August 2, 2012

Check how much your computer processor is fast.

Find out how much fast a computer processor is by following steps:
Step 1: Go to on Desktop and Right Click on My Computer icone.
Step 2: Now click on Property to gain access to important PC operating system information.
Step 3: Now you see that a window is open and you find your computer processor model and speed information.
Determine the processing speed of a computer using Windows XP or Windows Vista or Windows 7 with this method
For more detail watch this video.

Ammyy Remote Desktop Software Free

You can easily share a remote desktop or control a server over the Internet with Ammyy Admin.
There is no matter where you are, Ammyy Admin makes it safe and easy to quickly access a remote desktop within a few seconds.


System Administration
remote desktop connection for system administration
You can manage network computers and servers remotely without complicated NAT settings adjustments or Firewall problems. Assist your colleagues with remote access software and be confident all the transmitted data is reliably secured. Using Ammyy Admin as a tool for remote desktop connection and control is the best way to save time and money.

Remote office
remote desktop sharing in remote office
You will have quick and easy access to your remote office PC desktop via the Internet from anywhere, at any time. Remote desktop access lets you retrieve necessary documents and files from your work PC or activate specific software installed on the office computer. Ammyy Admin is also a perfect solution for enabling employees to work offsite from a remote location.

On-line presentations/distance education
free remote desktop access for webinars
With Ammyy Admin it's easy to arrange on-line presentations or hold virtual classes for distance education. You can host your presentation featuring class materials right in the remote desktops of meeting participants or students in the virtual classroom, communicating with them via real-time voice chat.

No installation required
To start remote desktop control session with Ammyy Admin you don't have to download and install massive remote desktop software which brings dozens of files and records to user's and system folders or system registry.
All you have to do is to download a tiny (0.5 Mb) Ammyy Admin exe file, start it and enter a computer ID which you want to connect to. It's really the simplest way to establish a connection to a remote PC avoiding tedious settings adjustments. It will take no longer than 20 seconds from the moment you download Ammyy Admin to the moment of the first remote session launch

Built-in voice chat and file manager
You can use Ammyy Admin not only as a tool for remote desktop connections and control but also as a free tool for voice communication with your relatives and partners over the Internet. Moreover Ammyy Admin offers a convenient file manager which makes it easy and quick to retrieve files from remote PC.

Control of unattended computers
Ammyy Admin allows its users to administer a remote unattended server or PC with the use of Ammyy Admin Service feature. This includes option to restart computer remotely, log in/log off or switch users. Present feature is the most actual among system administrators.

For download this software Click Here
For more help and information please watch this video


Source: Ammyy

Tuesday, July 31, 2012

How to use MyPublickWifi


Many users ask these questions,
How I access internet from my Laptop that is connected with Internet and my Phone is Wifi enable.
How I create Wifi hotspot in my Laptop or Computer.
How I use my Laptop or Computer with WLan as WiFi Access Point.
These all question answer is explained in following method.

Requirement:

  • Wireless Card for PC or Wifi enable Laptop.
  • MyPublicWiFi Software (Click Here to download)

Step 1: Download MyPublicWifi
Step 2: Install MyPublicWifi in your PC or Laptop.
Step 3: If your wifi or WLan is disable, then Enable it
Step 4: First Start MyPublicWifi and Configure as you see in Following Picture.


Step 5: Now Click on "Set up and Start Hotspot". Now your MyPublicWifi or Virtual Wifi is active.

You can connect your mobile phone or Laptop with MyPublicWifi and access the internet or network services.
If you want to Stop MyPublicWifi, then Click on "Stop Hotspot" and your Virtual Wifi is Stop.
If you have any difficulty or any problem, then tells us through below comments form.

For more detail and information please watch this video or visit official website.


Monday, July 30, 2012

Use Your Android Phone as a Wi-Fi Hotspot for Free


Android: The Wi-Fi hotspot feature on Android phones lets you use your mobile data on multiple computers or tablets at once. The only problem is a lot of carriers have restrictions to prevent you from sharing your mobile data (which you're already paying for) for free. Computerworld posts a couple of workarounds.
First, you should know that, as with other kinds of tethering, your carrier may not be too happy with you going around their special Wi-Fi hotspot plans, and you can end up pissing them off and being charged extra (or in extreme cases, having your contract canceled). Also, these workarounds might not apply to every wireless carrier or device (it doesn't for me on T-Mobile with a Samsung Galaxy S2, but some commenters on Computerworld vouch for the method).

That said, if you only plan on using this occasionally and are willing to take the risk, here's how to get the hotspot functionality working:

Install a third-party power widget app. Computerworld suggests Extended Controls ($0.99), but you can try a free one like previously mentioned Elixir 2
Use the widget app to add a widget to your homescreen that toggles your hotspot Wi-Fi on or off.
Turn on the Wi-Fi hotspot
Pretty simple! Computerworld says that this workaround activates Android's built-in hotspot functionality, bypassing any menu-level modifications.

An alternative is to use a free app called FoxFi. It doesn't work with Android 4.1, though, and some carriers are blocking it from being downloaded, but you may be able to install it from an alternate location or with the QR code in the Play store.

If this trick works for you or you have any other suggestions, let us know in the comments below.

Source: LifeHacker

Friday, July 27, 2012

How to Forward Facebook chat to other friends.


Our mostly friend always ask that how we share or forward Facebook chat with other friends.
Sorry to say that there is no option to forward Facebook chat or message to other friends, in past Facebook had this option but now days there is no option to forward chat.
Only one method we can use that is Copy and Paste. Just copy your friend conversation and past in other friend chat box.

If you have any difficulty or any problem then tell us through below comments form.

Wednesday, July 25, 2012

Share Facebook Photos Quickly with iPhone App


Download Facebook Camera, a new iOS app which is the fastest way to post and share Facebook photos instantly from your iPhone or other Apple mobile device. As photo sharing gets more popular, and people seek faster ways to post photos, Facebook makes it less cumbersome using Facebook camera app.
Download Facebook Camera
Try the new Facebook Camera app and share Facebook photos with your Facebook friends faster than ever. When you login, you get to see all the photos shared by your Facebook friends in your news feed. What has caught the media buzz is that Facebook recently acquired Instagram, another hugely popular image sharing app, and it is to be seen how Facebook integrates / competes with Instagram.
Unlike before when you needed to post one photo at a time, the Facebook Camera app lets you select and post multiple images in one go. At the same time, it lets users post captions, tag friends and share locations. The app also features basic image editing features like crop, rotate and can add special image effects using camera filters.

Download Facebook Camera app from Apple App store. Will work with iPod, iPhone and iPad. Use it and it will change the way you use photo sharing on Facebook.


Source: QuickTips

Tuesday, July 24, 2012

Create a Free Logo for your website or blog


In this video you learn how to create a free logo for your website or blog. The free design software at www.LogoVictory.com allows you to create and download a logo for your website or blog, free using a template driven system. This video walks a user through the various tools of the design editor so that it is easy to use and create a logo. http://www.LogoVictory.com
You can add pictures, text and other shapes for best look of your logo.
How can we give it away for free? Simple, if you create a logo and download your jpeg for free, we are fine with that and thousands of people have already done it. But some people ask to create a profiessional .eps file for them from their design. They charge $50 for this. Other people ask her to put their logo on letterhead or signs or stickers. They like this as well. But the bottom line is simple, if you want a hassle-free logo at no cost, then use do-it-yourself system and have fun creating a great logo and have fun with it!

Monday, July 23, 2012

How to Recover Deleted Data from Memory Card Step by Step


How to Recover Deleted Data from Memory Card Step by Step
In this tutorial you learn step by step how to recover data from memory card that you ever accidentally deleted from your cameras memory card? Or pressed the Format button instead of delete button and wiped your card clean?
Searching on Google for recover data/photos from memory card, and you’ll find lot of programs out there for sale. Most people don’t mind paying to recover some important pictures and that’s why those programs exist.
However, there are also a lot of good open source / freeware apps out there that can usually get the job done. And that’s where the nice people at CONVAR come in – offering a program called PC Inspector Smart Recovery, which can recover lost pictures for free. What’s even better is that it’s extremely easy to use and works well (based on my tests).
Please note that after you’ve lost the picture, do not take any more pictures or write any data on your memory card, as writing new data to the card lowers your chances of recovering the picture. Also note, that recovering the picture is not 100% guaranteed, but there’s a good chance your picture will be recovered.


PC INSPECTOR Smart Recovery is a 100% free program, which can recover lost data from not only memory sticks, but also for any kind of memory device available nowadays. If you have deleted any kind of file, you can usually rely on PC INSPECTOR Smart Recovery to recreate and reconstruct the file again, with great accuracy.
PC INSPECTOR Smart Recovery runs on all Win 9x, ME, NT 4.0, XP and Windows 2000 systems and supports the following picture formats: .jpg, .amr, .tif, .bmp, .gif, Canon .crw , Fuji .raf , RICOH .raw, Olympus .orf (E-XX), Olympus .orf (C5050), Nokia 3gp, Kodak .dcr, Minolta .mrw, Nikon .nef (D1H/D1X), Nikon .nef (D2H/D2X), Nikon .nef (E5000/E5700), Sigma – Foveon .x3f, mp4, QuickTime .mov (Konica Minolta). Video files in .avi, QuickTime .mov format and audio files in .wav, .dss format can also be recovered.
Using the software is straightforward and doesn’t need a detailed explanation. Simply plug in your memory device, run the program, and you’re set. But if you really want a step by step instruction, here it is:
Step 1: Download PC INSPECTOR Smart Recovery. Click Here for download
Step 2: Connect your memory card, either by a little memory card reader, or hook your camera up to the PC via the data cable.
Step 3: Run PC INSPECTOR Smart Recovery.
Step 4: Select the drive which is the memory card. It should be the one that has just connected.
Step 5: Leave the format type as .JPG.
Step 6: Choose a destination for the recovered files.
Step 7: Press ‘Start’.


If you are able to recover the picture, but you can’t view it, you may want to perform a search on how to view damaged or corrupted files.
As a test, I deleted some pictures from my Sony digital camera and run PC Inspector to see if I could get them back. So far, it’s been able to recover the deleted pictures and videos as long as I don’t take any other pictures after the deletion.


You may also like


Monday, January 16, 2012

Recover Deleted Photos and Videos from memory card

So today I thought I’d take a chance to give a review of an application that can be very useful and has come to the rescue before. The program that I’m talking about is called “Recuva” and is used to recover files that have been deleted.
Normally, when you delete a file in a Windows OS the file is moved to the “Recycle Bin” (unless you have disabled the recycle bin, or the file is too big for the recycle bin.) But after you empty the Recycle Bin, it’s gone forever right?
The answer is no. When a file is removed from the recycle bin, it’s still on your hard drive (or SD card, or thumbdrive, etc.) it’s just been marked by the operating system to be deleted. This means that until the OS needs that space for another file, it’s still there, although you can’t see it.
Recuva, allows you to find files that have been “deleted’ but are still hanging around. Recuva is made by Pirirform, the makers of CCleaner and Defraggler. All of these software applications are free to download and use, but if they help you out, consider making a Pay Pal donation through the website to the company for their hard work.
A quick note. Recuva finds files that have been marked for deletion but have not been overwritten yet. If you download the Recuva app to the hard drive that contains the files you are trying to recover, then there is a good chance that you may overwrite those files with the Recuva program. The best thing to do is download it and install it before you need it so that you won’t overwrite the files, or you can download and run the program from a thumb drive  or external drive (i.e. portable mode).
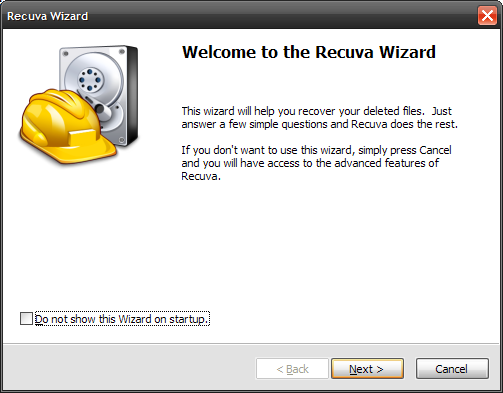
I’ll walk you through an example of how to use the program. So let’s say I have an SD Card in my Windows PC that has some vacation pictures on it, and I accidentally delete them and they’re not in the Recycle Bin. Fire up Recuva, this opens the “Recuva Wizard”:
Fig2
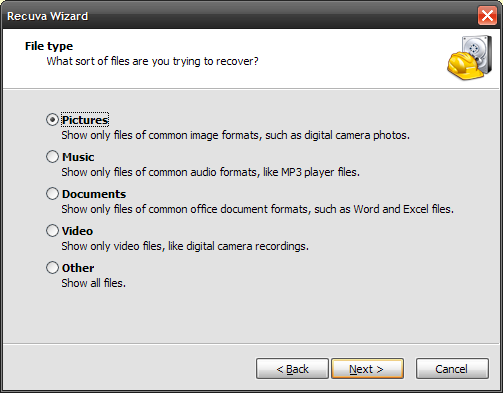
Click next. The next screen gives you a listing of file types to recover:
Fig3
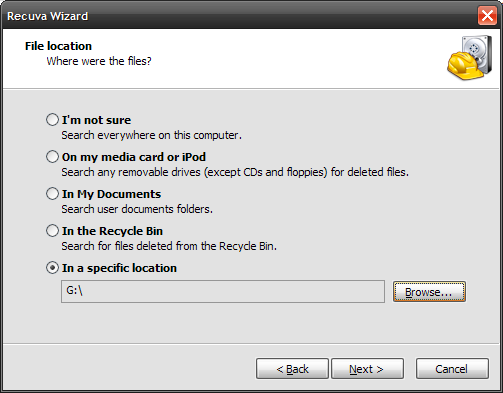
So I’ll select “Pictures” and click Next again. The next window asks where the files are located. If you’re not sure you can click the first option which will search the entire computer for files indexed as deleted. Depending on the size of the hard drive this could take some time, so it’s best to narrow down the search if you can. You can also select: My Documents, media card or iPod, the Recycle Bin, or you can browse to a specific directory location. I’m going to select the “G” drive, because I know that is the location of my SD card.

You may also like


Fig4
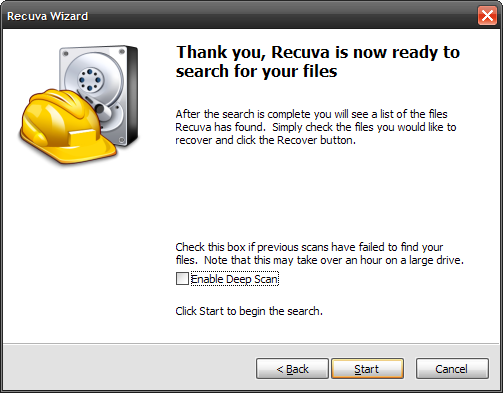
Click Next again. Recuva lets you know that it will now attempt to recover the files in the location you have selected. Click Start to begin or Back to change something on a previous screen. You can also select a “deep scan” for a more in depth search. This could take some time. Since we’re just showing an example I click Start.
Fig 5
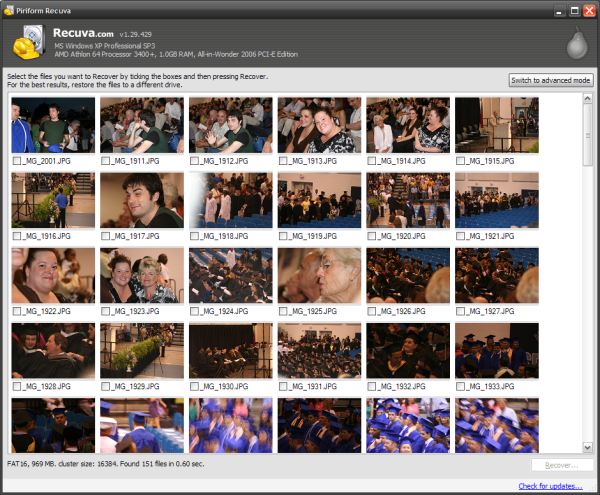
And now we see that not only did Recuva find the files I recently deleted, but it also found some old graduation photos that were still on the flash card that had not been overwritten yet. So just simply check the files to recover and click the “Recover” button in the bottom right.
Fig6
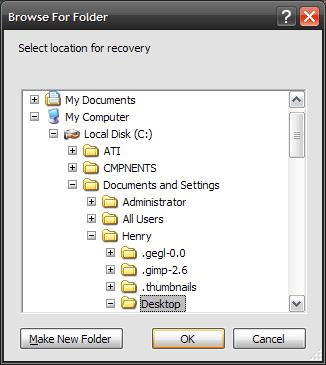
When you choose your files and click recover, you can then browse to the location on your computer that you would like the files to be placed. To easily find them I’ll go to my Desktop.
Fig 7
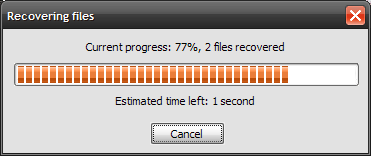
Click OK and you’ll get a progress bar showing the file recovery:
Fig 8
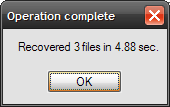
And then another box when it’s complete:
Fig9
Now the wizard is meant to be easy and simplistic. There are a lot of other advanced options you can access by going through the Recuva menu.
As always, if you have any questions or have a topic you’d like to see in a future blog, leave me a comment. Thanks for reading.

How to Find Page Rank of website.

A web designer/developer need to find out his own website page rank.
So there is simple method to find out Page Rank PR of any website.

STEP 1
Click and go on this website http://www.prchecker.info/check_page_rank.php

STEP 2
Type your website or which website you want to know page rank in URL box like www.techtipsfly.blogspot.com and click on Check PR button.

STEP 3
Now a anti-bot code box is appear. See and understand anti-bot code and type in anti-bot code box. see this example.


STEP 4
Finally click on Verify Now button and get your given website Page Rank like this 3/10.
Reference: ThinkBeyondWindow

Friday, January 6, 2012

Set Windows 7 Static IP Address

There are some subtle changes between Windows 7 and either Windows XP and Windows Vista. Since I use virtualization (with VMWare Fusion) extensively to test environments, I seem to go through this drill too often. By the way, I upgraded to VMWare Fusion 3 before testing the production releases of Windows 7.
The easiest Windows 7 installation uses DHCP. That’s what I did before patching the OS, installing virus protection software, and installing a few tools and program. Then, I change from a dynamic IP to static IP address and add a meaningful name to the C:\Windows\System32\Drivers\etc\hosts file. Here are the steps to set a static IP address on Windows 7:
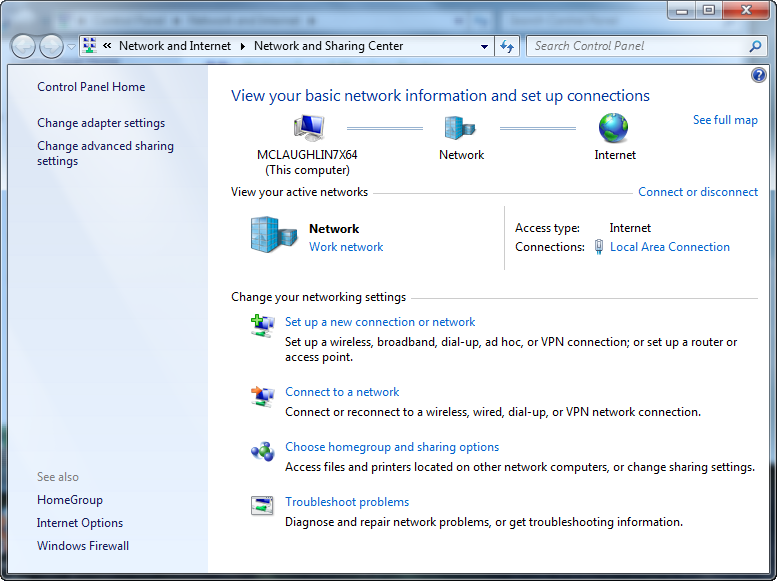
  1. Assuming that you’re in the Category view, you should navigate to the Control Panel, choose Network and Internet, and then click Network and Sharing Center. This is the window that you should see (click image to enlarge it):
NetworkSetup1
    Click the Local Area Connection to begin configuring your static IP address.
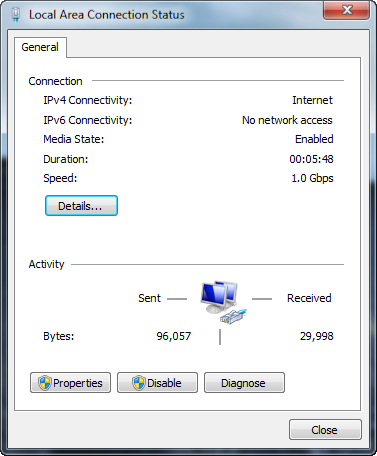
NetworkSetup2
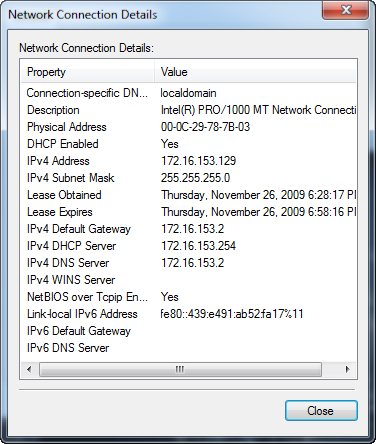
  1. From the Local Area Connection Status window, click the Details button to see your existing connection details (most likely DHCP). If you’re running this in VMWare Fusion, the 172.16.153.129 is the first IP address allocated. You should note the default gateway and DNS server IP address, which should always be 172.16.153.2. Click the Close button when you’ve made note of those IP addresses for subsequent steps.
NetworkSetup3
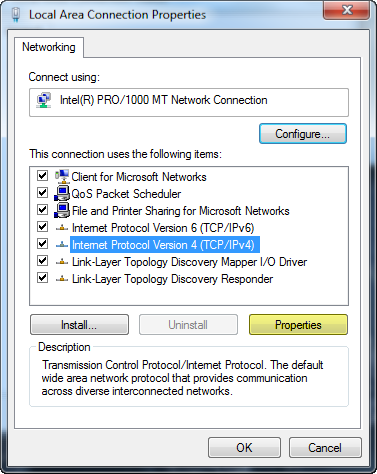
  1. Back at the Local Area Connection Status window, click the Properties button. It will show you the Local Area Connection Properties dialog. Click on the Internet Protocol Version 4 (TCP/IPv4) in the item box of the dialog window.
NetworkSetup4
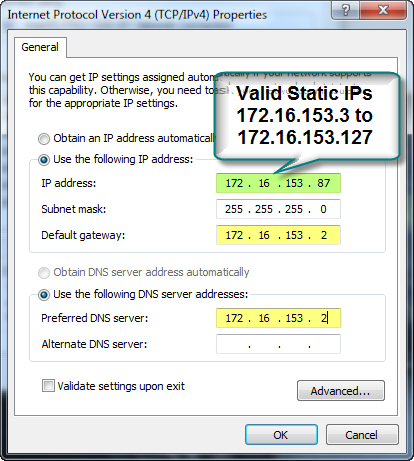
  1. Click the Use the following IP address radio button and enter the appropriate values for your static IP address. The default gateway and DNS server are generally different but are the same when you’re using NAT addressing inside VMWare.
NetworkSetup5
You should be completed now. If you test the connection, Windows 7 raises and error but everything works after you reboot the operating system.