Friday, May 20, 2016

Download YouTube Videos on Your Android Phone

You're watching an awesome Web series or boogying down to a music video on YouTube when you realize that you're about to go somewhere with little or no connectivity. Fortunately, with a few simple steps you can save any video on YouTube to your Android phone for offline viewing. You can even convert music videos to MP3 files you can put on your playlist. Here's how to download YouTube videos on your Android phone.

Note: Downloading videos may violate YouTube's terms of service.

Installing YouTube Downloader

1. Navigate to the settings menu on your Android phone.
2. Select Security.
3. Toggle "Unknown sources" to on if it is not already checked. This setting will make sure you can install apps that don't come from Google Play.
4. Download YouTube Downloader from Dentex's blog on your Android phone.

5. Tap the download notification for YouTube Downloader in your notification drawer.
6. Tap Install. The program will take a few seconds to install.
You can browse videos and download them either through the YouTube app or by using the YouTube Downloader's search feature. We prefer using YouTube's own app.

Downloading Videos From the Official YouTube App

1. Find the video you want in the YouTube app.

2. Tap the share button which appears when you tap on the video player.
3. Select YouTube Downloader from the share menu.
4. Select the video / audio format you wish to download. We recommend MP4 files in 1080 or 720p for videos and MP3 files if you only want the audio.

5. Tap Download here to confirm.

6. Tap Download to grab a plug-in file if necessary. This will only happen the first time you download a file in a given format.

Downloading Videos Directly From the YouTube Downloader App

1. Open YouTube Downloader.
2. Enter a term in the search box and tap the search button. A list of videos appears.

3. Tap the video you want to save. A list of options appears.
4. Select the video / audio format you wish to download. We recommend MP4 files in 1080 or 720p for videos and MP3 files if you only want the audio.

Whichever way you find your video, YouTube Downloader will then take anywhere from a few seconds to a few minutes to download and store it on your phone. You can play the file directly from YouTube Downloader or find it in the Download folder on your phone.


Source: Tomsguide

Thursday, May 19, 2016

Use your Laptop or Mobile WiFi as hotsopt free

mHotspot is simple and easy software for Laptop and Mobile. You can sharing your internet from laptop or mobile to other WiFi devices using mHotspot free software.
There are main key functions

Extend WiFi range

A laptop installed with mHotspot can act as a repeater. Yes, the laptop can increase the range of a wifi network by generating an additional wifi network as shown in the figure below.

Track Usage

View the details of  connected devices – Name, Ip Address, Mac Address. View the Upload & Download speeds. View the amount of data used – Upload & Download.

High Speed: Stream Videos & Transfer Files

Stream videos, and share files to any device securely in 3 steps in High Speeds.

It Just Works

No external hardware or setup is required. It Just works with your laptop.

Lightweight & Simple

The brilliant feature of mHotspot is that it doesn’t require too much of RAM. Works blazing fast on low-end laptops too!

You may like How to use MyPublicWiFi

Features:


  • Connect upto 10 devices to the hotspot
  • You can set your own hotspot name without any restrictions
  • Share any type of Internet Connection(LAN, Ethernet,3G/4G,Wifi etc)
  • Android phones, ipads, PDAs, tablet-pcs and other devices can access internet
  • Stream videos and shares files to clients
  • See the details of the connected device(Name, Ip Address, Mac Address)
  • See the network usage(Upload and Download Speed, Transfer Rates)
  • Secures your wireless hotspot with WPA2 PSK password security
  • Set max. number of devices that can be connected
  • Extends your Wifi range(Acts as a repeater)
  • In-app internet selection
  • Works with Windows 7,8,10
  • Also available for Android (Turns your phone into WiFi Hotspot)
Video Tutorial

You can download mHotspot for Windows, Android and Ubuntu operation systems from below link.


Wednesday, May 18, 2016

Top best 10 Windows 8 tips and tricks


Update to Windows 8.1

Microsoft has released Windows 8.1, which is a free upgrade for anyone running Windows 8. This update addresses many of the problems users have had with Windows 8 and also adds a Start button. Visit Microsoft's Windows 8.1 page for the update.

Customize your tiles

Windows 8 tiles
Make the most of your Windows Start screen tiles by adjusting the sizes, where they are located, and what is listed.

  • Move any tile by clicking and dragging the tile. While moving a tile, if you need a larger view of the Start screen move the tile towards the top or bottom of the screen to zoom out.
  • Use your mouse wheel to scroll left-to-right through your tiles.
  • Any Desktop shortcut or program can be pinned to the Start screen by right-clicking the icon and choosing Pin to Start.
  • In the bottom right-hand corner of the start screen is a magnifying glass with tiles, click this icon to get a zoomed out view of your Start screen. In this view, if you right-click on a group of tiles you'll be given the option to name group, which can be useful if you have a group of related tiles (e.g. games). In this view, you can also click and drag a group to organize your tile groups.
  • Create a new speed bump between tile groups by moving a tile to a speed bump.
  • Resize any User tile or Live tile by right-clicking the tile and choosing resize.
  • If there is a tile you want on your Taskbar, right-click the tile and choose Pin to taskbar.
  • Show admin applications on the Start screen by clicking Settings in Charms, click Settings, and change the Show administrative tools from No to Yes.
  • In Internet Explorer 10, you can also pin any of your favorite web pages to your Start Screen.

Windows 8 keyboard shortcuts

Knowing at least some of the Windows 8 keyboard shortcuts helps make your Windows 8 experience much more enjoyable. Try to memorize these top Windows 8 shortcut keys.
  • Press the Windows key to open the Start screen or switch to the Desktop (if open).
  • Press the Windows key + D opens the Windows Desktop.
  • Press the Windows key + . to pin and unpin Windows apps on the side of the screen.
  • Press the Windows key + X to open the power user menu, which gives you access to many of the features most power users would want (e.g. Device Manager and Command Prompt).
  • Press the Windows key + C to open the Charms.
  • Press the Windows key + I to open the Settings, which is the same Settings found in Charms.
  • Press and hold the Windows key + Tab to show open apps.
  • Press the Windows key + Print screen to create a screen shot, which is automatically saved into your My Pictures folder.
See our Windows shortcuts page for a full listing of all Windows shortcuts.

Know your hot corners

The corners on your screen are hot corners and give you access to different Windows features. Below, is a brief explanation of each of these corners.
Bottom Left-hand corner
The bottom left-hand hot corner of the screen allows you to access the Start screen. If you're in the Start screen and have the Desktop open, this corner opens the Desktop from the Start screen.
Tip: Right-clicking in the left hand corner opens the power user menu.
Top-left corner of the screen
Moving the mouse to the top-left corner and then down displays all the apps running on the computer. Clicking and dragging any of these apps to the left or right-hand side of the screen will snap that app to that side of the screen. Each of these open app icons can also be right-clicked to close or snap.
Right-hand side of the screen
On the full right-hand side of the screen will be given access to the Windows Charms.

Taking advantage of search

The Search in Windows 8 has been significantly improved when compared to all previous versions of Windows. To search for a file or run a program in Windows 8 from the Start screen just start typing what you're trying to find or want to run.
As you begin typing, the results will start appearing on the left-hand side. The Search also supports limiting the search to apps such as Finance, People, Maps, Photos, Mail, Music, Videos, Weather, and much more. If what you are searching for is not a file or program, click on the app you want to use as the search. For example, if you were searching for "New York" and selected the Weather App you would be shown the weather in New York, NY.
By default, Search organizes the available Apps by how frequently they are used and then in alphabetical order. If you want to keep your favorite app at the top of the Search list, right-click the app and choose Pin. Pinning the app will lock it in place regardless of how often it is used. If there is an app you don't want (e.g. Finance) you can turn on and off any of the search apps through the PC settings, which is found under the Settings in the Charms.
Bonus tip: The Search is also found through Charms and can also be opened by pressing Windows key + F.

Running two apps side by side

Any app can be pinned to the left or right-hand side of the screen. For example, open the People app and then press the Windows Key + . (period) to move that app to the right-hand side of the screen, pressing the same keys again will move it to the left-hand side, and pressing the same keys again makes it full screen. While an app is pinned, any other app or program can be opened and loaded into the available space on the screen. For example, in the picture below, we've opened a browser window and have the People app running to monitor our social networks.
Windows 8 People
Any open app can also be pinned using your mouse by clicking at the top of the tile and dragging it to the left or right-hand side of the screen.
Bonus tip: The Desktop can also be pinned to the left or right-hand side of the screen.
Note: For snap to work properly your resolution must be at least 1,366 x 768.

Windows 8 Task Manager

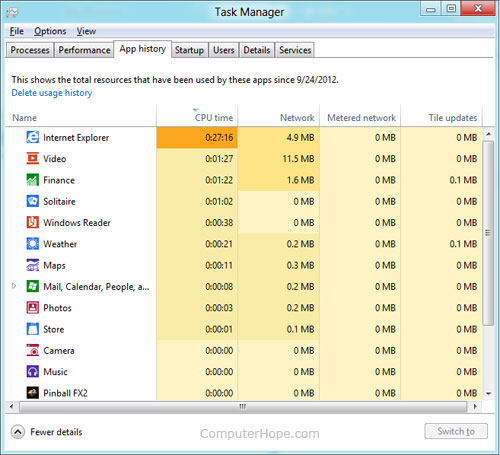
The Windows 8 Task Manager has been significantly improved over previous versions of Windows. Some of the changes include a total percent usage of your Processes, improved Performance graphs, a Startup tab to see startup processes, and the App history tab (as shown below) for total resources an app. Press Ctrl + Shift + Esc to start exploring the new Task Manager.
Windows 8 Task Manager

Use a picture password to log into your computer

Windows 8 includes a new feature called Picture password, which allows you to authenticate with the computer using a series of gestures that include circles, straight lines, and taps. Enable this feature if you want a new way to access your computer or have a hard time with passwords.
  1. Open the Windows Charms.
  2. Click Settings and then More PC settings
  3. In the PC settings window click Users and then select Create a picture password
Bonus tip: A four digit pin password can also be created and used to access your computer.

Take advantage of Windows 8 apps

Windows 8 comes included with several apps to help you get the most from your computer. Below are just a few of the included apps.
People
Microsoft touts the People feature in Windows 8 because they understand how many people are using social networks today. In the People feature you'll be able to connect your Windows computer to all the major social networks including FacebookLinkedIn, and Twitter. Once connected, you can pin the people app and monitor your social network (as shown below), use People in Search to find people, and get an overview of what is happening in all your social networks.
Windows 8 People
Reader
The Reader app gives you PDF support right out of the box.
SkyDrive
The SkyDrive app gives you access to the Microsoft cloud service for storing photos, documents, and other files in a cloud and access or share those files easier.
Store
Take advantage of the Windows Store and install one or more of the thousands of available apps designed for Windows 8. The Store is found in the Start screen, or use Search to search the Store app for any apps that you are trying to find.

Know the answers to common questions

Windows 8 is the biggest change to Microsoft Windows since the introduction of Windows 95, which was released all the way back in 1995. Since so many people have grown up with Windows, it can be difficult to transition to a new way of doing things. Below, is a short list of the most common questions previous Windows users have.

Know the Jargon

Knowing all the new jargon introduced with Windows 8 help improve your familiarity with Windows 8 and make it a more enjoyable experience. Below, are just a few links to the most commonly used Windows 8 terms.
  • Charms
  • Lock screen
  • Picture password
  • Pin
  • Power User Task Menu
  • Snapped app
  • Speed bump
  • Start screen
  • Tile, User Tile, and Live Tile
  • Windows Store 
Source: Computer Hope

Saturday, April 16, 2016

Unblock Blocked Websites with two methods


Many workplaces and schools are cracking down on the websites and online services. Blocking access to social sites has been a common tactic. The most common websites that are blocked in schools include MySpace, Bebo, and Facebook.

There are however always legitimate reasons to bypass the internet filters and visit the blocked websites. The following methods will help you access blocked websites in school, college or your company.

Trick A: Using a web proxy to bypass restrictions. Proxies that focus on website browsing are called web proxies. A web proxy works by acting as a "middleman": it downloads the requested pages to its proxy server and in turn, you download the page, all images and other such objects from the proxy server to your browser, thus bypassing any filters and annoying firewalls.

Assban.com ( http://www.assban.com ) is a popular web proxy. You can search on Google for "myspace proxy" and find many other web proxies as well.

But chances are that your school administration has already blocked access to most web proxies as well. In that case, you have one more options:

Trick B: You can download Ultrasurf (http://www.ultrareach.com/company/download.htm ) and save it to a USB stick. UltraSurf is a green software, which means no installation process is needed nor system setting is required to change when using the software. UltraSurf implements almost all browser functions based on HTTP and user needs, such as browsing websites, login and posting on web forums, using Web mail, uploading and downloading data files, real-time audio, video and other multimedia programs, etc.

The more people are aware of these tricks, the more likely your network administrators will catch on and find ways to shut them down. So be sure not to let others know how to do these tricks. Accessing unauthorized websites using the above tricks may be considered a violation of school or work policies and might put you in trouble. Use them at your own risk.

Thursday, April 14, 2016

How to Use Google Maps without the Internet (Offline)

Many of my blog readers ask the question that we like Google Map but sometimes we did not have internet access so how we can use Google map without the internet or offline. Read this complete tutorial and learn how we can use Google Map without the internet or how we can use Google Map offline.

With offline maps, you can download an area on Google maps and take it offline, this means you can use the navigate feature in the offline maps without having to connect to the internet. This is particularly useful if you are going aboard and don’t want to spend on cost of data connection.

So, here is how to use Google Maps offline in Android and iOS.

Google Maps

Offline Maps in Android:

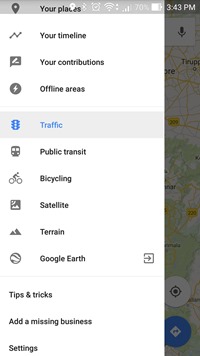
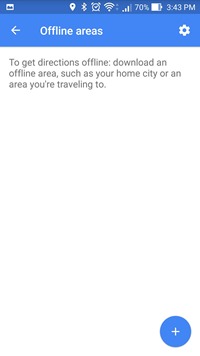
Open the Google Maps app and then click on the three lines on the top. This will bring in the menu, you can also swipe from the left side. Under this menu, you will see the option “Offline areas”. Click on this and you now get a + sign at the bottom of the screen to add a new offline map.

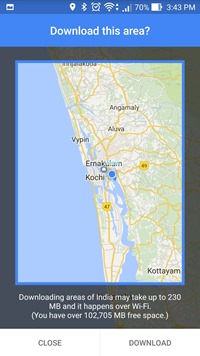
The next step is to select the area to download, you can pan or zoom in or out the area in the box which is the actual area that will be downloaded. You can also see the size of the maps which will be downloaded and this changes based on the area you select for download.
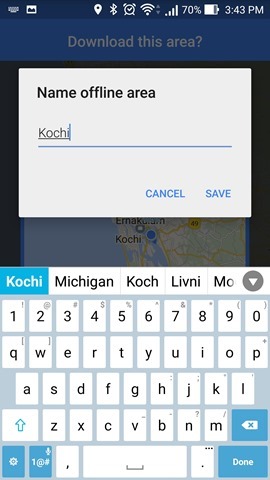
offline maps Google (2)offline maps Google (3)offline maps Google (4)

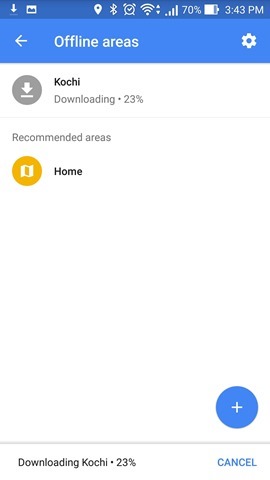
You will be prompted to enter a name for the map you want to download. Now click on the Save button and make sure your phone is connected to Wi-Fi. This will take some time based on the size of the maps.

offline maps Google (5)offline maps Google (1)
Once the download is complete, you will see it under offline areas. Using the downloaded area, you can navigate without having to connect to The Internet.

Offline Maps on iOS:

In iOS, this feature is being rolled out and not all users might be able to use. The steps for downloading maps offline is similar to Android and you need to search the area, then swipe from bottom and click the download button.

You can also select the area manually.

Limitations of Offline Maps:

  • Offline maps can only be used for downloading smaller areas, which means you will not be able to download a big country as it might runs into several GB in size. Ideally, this feature is useful to download a city map
  • Maps downloaded will be stored for 30 days and after this, they are automatically deleted
  • If you are downloading multiple locations, make sure you have enough space on your phone to store it.