Monday, January 16, 2012

Recover Deleted Photos and Videos from memory card

So today I thought I’d take a chance to give a review of an application that can be very useful and has come to the rescue before. The program that I’m talking about is called “Recuva” and is used to recover files that have been deleted.
Normally, when you delete a file in a Windows OS the file is moved to the “Recycle Bin” (unless you have disabled the recycle bin, or the file is too big for the recycle bin.) But after you empty the Recycle Bin, it’s gone forever right?
The answer is no. When a file is removed from the recycle bin, it’s still on your hard drive (or SD card, or thumbdrive, etc.) it’s just been marked by the operating system to be deleted. This means that until the OS needs that space for another file, it’s still there, although you can’t see it.
Recuva, allows you to find files that have been “deleted’ but are still hanging around. Recuva is made by Pirirform, the makers of CCleaner and Defraggler. All of these software applications are free to download and use, but if they help you out, consider making a Pay Pal donation through the website to the company for their hard work.
A quick note. Recuva finds files that have been marked for deletion but have not been overwritten yet. If you download the Recuva app to the hard drive that contains the files you are trying to recover, then there is a good chance that you may overwrite those files with the Recuva program. The best thing to do is download it and install it before you need it so that you won’t overwrite the files, or you can download and run the program from a thumb drive  or external drive (i.e. portable mode).
I’ll walk you through an example of how to use the program. So let’s say I have an SD Card in my Windows PC that has some vacation pictures on it, and I accidentally delete them and they’re not in the Recycle Bin. Fire up Recuva, this opens the “Recuva Wizard”:
Fig2
Click next. The next screen gives you a listing of file types to recover:
Fig3
So I’ll select “Pictures” and click Next again. The next window asks where the files are located. If you’re not sure you can click the first option which will search the entire computer for files indexed as deleted. Depending on the size of the hard drive this could take some time, so it’s best to narrow down the search if you can. You can also select: My Documents, media card or iPod, the Recycle Bin, or you can browse to a specific directory location. I’m going to select the “G” drive, because I know that is the location of my SD card.

You may also like


Fig4
Click Next again. Recuva lets you know that it will now attempt to recover the files in the location you have selected. Click Start to begin or Back to change something on a previous screen. You can also select a “deep scan” for a more in depth search. This could take some time. Since we’re just showing an example I click Start.
Fig 5
And now we see that not only did Recuva find the files I recently deleted, but it also found some old graduation photos that were still on the flash card that had not been overwritten yet. So just simply check the files to recover and click the “Recover” button in the bottom right.
Fig6
When you choose your files and click recover, you can then browse to the location on your computer that you would like the files to be placed. To easily find them I’ll go to my Desktop.
Fig 7
Click OK and you’ll get a progress bar showing the file recovery:
Fig 8
And then another box when it’s complete:
Fig9
Now the wizard is meant to be easy and simplistic. There are a lot of other advanced options you can access by going through the Recuva menu.
As always, if you have any questions or have a topic you’d like to see in a future blog, leave me a comment. Thanks for reading.

How to Find Page Rank of website.

A web designer/developer need to find out his own website page rank.
So there is simple method to find out Page Rank PR of any website.

STEP 1
Click and go on this website http://www.prchecker.info/check_page_rank.php

STEP 2
Type your website or which website you want to know page rank in URL box like www.techtipsfly.blogspot.com and click on Check PR button.

STEP 3
Now a anti-bot code box is appear. See and understand anti-bot code and type in anti-bot code box. see this example.


STEP 4
Finally click on Verify Now button and get your given website Page Rank like this 3/10.
Reference: ThinkBeyondWindow

Friday, January 6, 2012

Set Windows 7 Static IP Address

There are some subtle changes between Windows 7 and either Windows XP and Windows Vista. Since I use virtualization (with VMWare Fusion) extensively to test environments, I seem to go through this drill too often. By the way, I upgraded to VMWare Fusion 3 before testing the production releases of Windows 7.
The easiest Windows 7 installation uses DHCP. That’s what I did before patching the OS, installing virus protection software, and installing a few tools and program. Then, I change from a dynamic IP to static IP address and add a meaningful name to the C:\Windows\System32\Drivers\etc\hosts file. Here are the steps to set a static IP address on Windows 7:
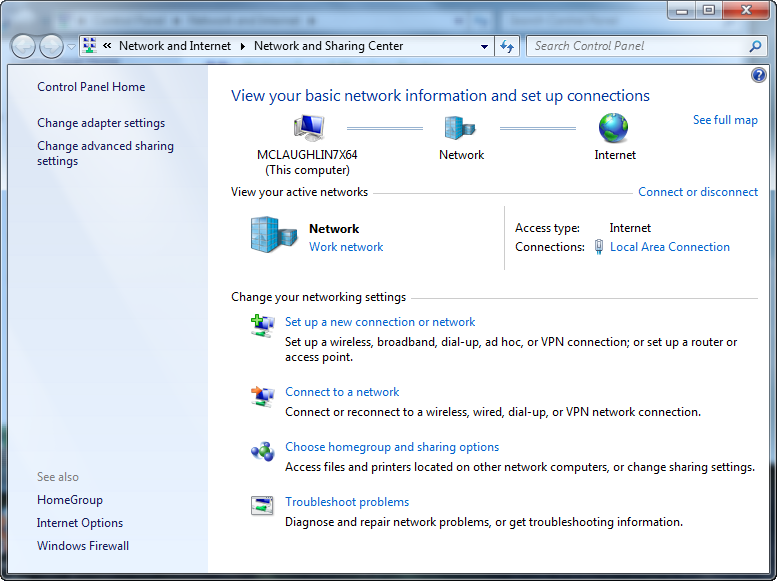
  1. Assuming that you’re in the Category view, you should navigate to the Control Panel, choose Network and Internet, and then click Network and Sharing Center. This is the window that you should see (click image to enlarge it):
NetworkSetup1
    Click the Local Area Connection to begin configuring your static IP address.
NetworkSetup2
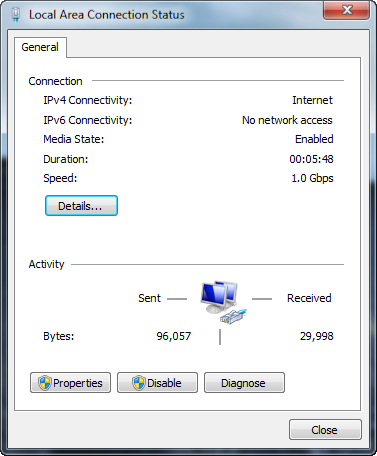
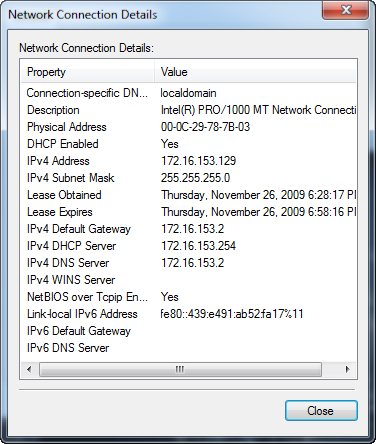
  1. From the Local Area Connection Status window, click the Details button to see your existing connection details (most likely DHCP). If you’re running this in VMWare Fusion, the 172.16.153.129 is the first IP address allocated. You should note the default gateway and DNS server IP address, which should always be 172.16.153.2. Click the Close button when you’ve made note of those IP addresses for subsequent steps.
NetworkSetup3
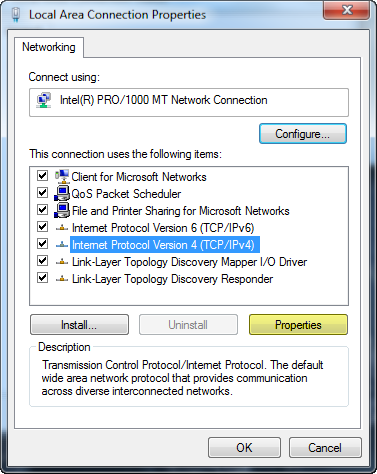
  1. Back at the Local Area Connection Status window, click the Properties button. It will show you the Local Area Connection Properties dialog. Click on the Internet Protocol Version 4 (TCP/IPv4) in the item box of the dialog window.
NetworkSetup4
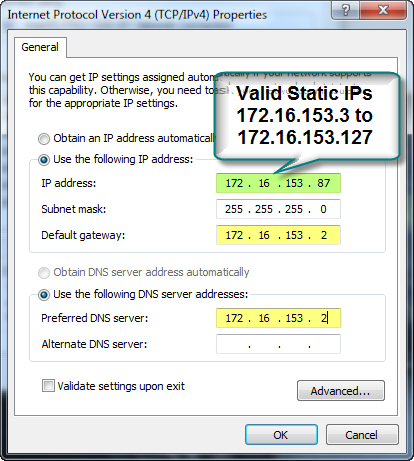
  1. Click the Use the following IP address radio button and enter the appropriate values for your static IP address. The default gateway and DNS server are generally different but are the same when you’re using NAT addressing inside VMWare.
NetworkSetup5
You should be completed now. If you test the connection, Windows 7 raises and error but everything works after you reboot the operating system.

Saturday, November 19, 2011

Movie Maker Video Editing Tutorial

Learn about video editing in Windows Movie Maker.

An easy video editing tutorial for beginners. Make your own YouTube Videos with Microsoft Windows Movie Maker 2. Dont Have it? Go to Mircosoft.com/moviemaker and download yours free!
Want this compiled video? Message me and I will email it to you. Questions on editing? Message me and I will help you! Want a better edititing suite for free.

Thursday, November 17, 2011

Use PTCL (EVO) in Linux Ubuntu 10.04

Starting from Ubuntu 9.10, Network Manager uses ModemManager to communicate with mobile broadband (CDMA, UMTS and others) cards. Ubuntu 9.10 uses version 0.2 of ModemManager which most probably has some bug because of which few modems dont get recognized. ZTE AC2726, the modem which comes with PTCL EVDO, is one of the unfortunate ones. In a previous post we have covered how to connect to PTCL EVDO in Ubuntu 9.10. If you have Ubuntu 10.04 or later you can use the following procedure to connect to PTCL EVDO.

Install usb_modeswitch using the following command:
  • sudo apt-get install usb-modeswitch usb-modeswitch-data
after installing usb_modeswitch plug your modem in. If your modem is already plugged in remove it and then plug it back in. Now use lsusb command to see if your modem is properly recognized. The output should contain a line like:
Bus xxx Device xxx: ID 19d2:fff1 ONDA Communication S.p.A.
Now go to System->Preferences->Network Connections. Click on Mobile Broadband Tab.

Now click Add. In the new window that appears, you will have ZTE device already selected.

Click on forward. Select Pakistan from Next Screen and press forward. In next screen manually enter PTCL EVDO as your provider and click forward. Now click Apply.

In the new Window enter vwireless@ptcl.com as user name and ptcl as password and click apply.

You are all set. To connect to this connection click on Network Manager icon in Taskbar. Select this newly created connection and click connect.

Wednesday, November 16, 2011

How to configure Gmail account in Outlook.

Why should I use Outlook for my Gmail address?

Although the web based system of Google Gmail is one of the most feature rich webmail platforms, you may want to handle your Gmail account & messages from a client email software program such as Microsoft Outlook. For example, if you are using other email addresses and not just the Gmail account, most likely you would want to read and handle all your email accounts from the same interface & program.

dots Configuring the Outook Gmail settings.

You can configure Outlook to handle your Gmail account as a POP3 or as an IMAP account. Depending on your choice, you have to enable the related account option in your Gmail account (Gmail Settings -> Forwarding and POP/IMAP).


  • Below, we will detail how to setup Microsoft Office Outlook 2000 to 2010 to send, receive and store email messages for a Gmail address. Before getting started, please make sure you know your Gmail email address and your Gmail password.
  • Start Outlook: from the main Outlook window, go to Tools -> Email Accounts.
    selecting the Outlook email accounts for Gmail
    On the Outlook popup window, select to "Add a new e-mail account" and click on Next.
    Outlook add email account
    On the server type step, select POP3 or IMAP (depending on your needs) for the Outlook email account type, then click on Next. There is no need to select the IMAP type, because the Gmail web based account will anyway keep a copy of all emails, just like an IMAP account would do.
    gmail pop3 for outlook
    On the next screen, you will have to specify your Outlook Gmail settings, such as your Gmail username and password, Gmail server addresses, Gmail server ports and Outlook Gmail display name.


  • On the User Information section, enter your Name (it can be anything, but remember this is going to be the name/text that people will see when you will send them an email via your Outlook Gmail account) and your Gmail email address.
  • On the Server Information section, enter the Google Gmail servers:

    POP Gmail servers for Outlook:
    - Incoming mail server: pop.gmail.com
    - Outgoing mail server: smtp.gmail.com.

    IMAP Gmail server for Outlook:
    - Incoming mail server: imap.gmail.com
    - Outgoing mail server: smtp.gmail.com.

    As an alternative, you may setup any other outgoing mail server that you have access to, such as your ISP's SMTP server or your own hosted outgoing server. However, if you setup a 3rd party outgoing mail server, you will not have access to sent emails via your web based Gmail account panel.
  • On the Logon Information section, enter your Gmail User Name (which is the same as your Gmail email address) and your Gmail password. Tick the box "Remember password" in order to make Outlook to store the Gmail password, so it will not ask you about it every time when Outlook will send/receive emails for the Gmail account.
  • Click on the "More Settings" button and go to the "Advanced" window tab.

    If you use Gmail as a POP Outlook account:
    - On the "Incoming server (POP3)" field, enter 995 and mark the box "This server requires an encrypted connection (SSL)";
    - On the "Outgoing server (SMTP)" field, enter 465 and mark the box "This server requires an encrypted connection (SSL)".

    If you use Gmail as an IMAP Outlook account:
    - On the "Incoming server (IMAP)" field, enter 993 and mark the box "This server requires an encrypted connection (SSL)";
    - On the "Outgoing server (SMTP)" field, enter 587 and mark the box "This server requires an encrypted connection (TLS)".

    For both POP and IMAP, you also have to enable the option "My outgoing mail server requires authentication" from the Outgoing Server tab.

    You can also change the server timeouts period: this defines the time interval for which Outlook will wait to establish a Gmail connection, before triggering a connection error. The slower your Internet connection is, the greater period you should put.
    The "Delivery" options are not important for an Outlook Gmail account: no matter what you would change here, Gmail will always keep a copy of each email on the Gmail server.

    outlook gmail servers
    When you are done setting up your Outlook Gmail advanced settings, click on OK to return to the Outlook Gmail account window.

    gmail for outlook
    To verify your Outlook Gmail setup, click on the "Test Account Settings" button: this will make Outlook to attempt to login to your Gmail account and to send & receive an Outlook test email. If the test will succeed, you will notice the test email in your Outlook Inbox folder. If the test fails, Outlook will prompt you with the error messages - most likely, you didn't setup the correct server settings or the Gmail password is wrong.
  • 15 Best Tips for Windows 7

    You have upgraded to Windows 7, love the new taskbar, and enjoy the power of using the cool Libraries feature.
    But now you want more. You want the cool tips and tricks that make Windows 7 fun!
    So here are the best ones to help you get the most out of your new OS. In this article, we will focus on the Windows 7 interface to get you started on the road to becoming a Windows 7 Power User. In Part 2, we will be looking at advanced tips for usability, performance, and security.

    1. Use Keyboard Shortcuts

    Using the mouse, you can drag-”˜n-dock windows to either side of the screen, or drag it to the top to maximize it. These keyboard shortcuts are even faster:
    • Win+Left Arrow and Win+Right Arrow dock the window to the left and right side of the screen
    • Win+Up Arrow and Win+Down Arrow maximize and restore/minimize
    • Win+M minimizes everything
    • Alt+Up, Alt+Left Arrow, Alt+Right Arrow navigate to parent folder, or browse Back and Forward through folders in Explorer
    • Win+Home minimizes/restores all open windows except the active window
    • Alt+Win+# accesses the Jump List of program number ‘#’ on the taskbar

    2.Rearrange System Tray Icons

    SystemTray
    You can rearrange icons on the taskbar as you wish and start new (or switch to running) instances of the first ten taskbar programs using Win+1, Win+2, and so on. The cool thing is you can also rearrange system tray icons. Reorder them on the tray or move them outside or back in the tray. Take control of what you want to always keep an eye on, and from which apps you’ll require notifications.
    Ads by Google

    3. Access Jump Lists with the Left Mouse Button

    Jump Lists usually show up when you right-click on a taskbar icon. However, they can also be accessed by holding the left mouse button and dragging upwards. If you’re using a laptop touchpad or a touch screen, this is convenient because you do not have to click any button to access a context menu.

    4. Add Any Folder to Favorites

    AddToFavorites
    You can add any library or folder to the Favorites section in Windows Explorer. To add a folder, navigate to it in Explorer, right-click Favorites in the left navigation pane, and select Add current location to Favorites. Now you get quick access to your favorite folders in all File->Save As dialogs!

    5. Pin Frequently Used Folders to the Taskbar

    Right-click, drag, and pin your favorite folders to Windows Explorer on the taskbar. They will now show up in the Jump List when you right click on Explorer giving you quick access to your favorite folders.

    6. Pin Control Panel to the Taskbar

    PinControlPanel
    You cannot pin the Control Panel to the taskbar via the Start Menu or by drag and drop. Open the Control Panel and right-click its taskbar icon to pin it to the taskbar. An advantage of this is that Control Panel’s Jump List allows quick access to recently used functions.

    7. Create Keyboard Shortcuts for Programs

    You can create keyboard shortcuts for any program in Windows 7. Right-click the program icon and select Properties. Select the Shortcut tab, click in Shortcut key, to set the keyboard shortcut for that program.
    ProgramShortcutKey

    8. Open Command Prompt in Any Folder

    Like the command prompt? Miss the “˜Open Command Window Here’ Windows XP power toy? Press “˜Shift’ when right-clicking on a folder to get that option in the context menu. This also works on the desktop. No power toy required!
    ExpandedContextMenu

    9. View Expanded ‘Send To’ Menu

    Press Shift when right-clicking on a folder to get an expanded Send To menu.

    10. Adjust Screen Text with Clear Type

    Use Clear Type Tuner for the best look on your LCD monitor or laptop screen. Run “˜cttune.exe‘ from the Start Menu search box, or go to the Control Panel Display applet, and select Adjust ClearType Text from the left.
    ClearType Tuner

    11. Get Exact Colors On Your Screen

    If you are an artist or you work with colors, use the Calibrate Color option in the Control Panel Display applet or run dccw.exe from the Start Menu search box. You can adjust gamma, brightness, contrast, and color balance, ensuring that colors are displayed correctly on your screen.

    12. Customize the Power Button

    If you restart your computer more often than you shut it down, change the default Shutdown power button to Restart. Right-click on Start, select Properties, and choose the Power button action that you use the most.
    StartMenuProperties

    13. Customize Number of Items in Jump Lists & Start Menu

    Right-click Start, select Properties, click Customize and choose the number of recent programs to be shown in the Start Menu and the number of items displayed in Jump Lists from the Start Menu Size section below.

    14. Search Internet from the Start Menu

    SearchInternetStartMenu
    Enable Internet search from the Start Menu using your default browser. Run GPEDIT.MSC from the Start Menu search box to start the Group Policy Editor. In the left pane, go to User Configuration->Administrative Templates->Start Menu and Taskbar. In the right pane, right-click to Edit and Enable Add Search Internet link to Start Menu.
    SearchInternet

    15. Add Videos to Start Menu

    Windows 7 does not place a link to your videos on the Start Menu by default. To add a link to your videos on the Start Menu, right-click Start, select Properties, click on Customize. In the Videos section at the bottom, choose Display as a link.
    Add Videos

    Sunday, November 13, 2011

    How to set up a dynamic DNS for free


    This Video details how to set up a dynamic DNS using DynDns.com, i also briefly go in to port forwarding and the types of uses for having a dynamic DNS linked to your router.

    Some common ports are: (all TCP)
    Web Server: 80
    FTP Server: 21
    VNC Server: 5900
    Bittorrent: 6881-6889

    Saturday, November 12, 2011

    How to recover deleted files


    Learn how to recover deleted files from your computer.

    In this video tutorial you learn how to recover deleted files and folder in your computer. It is easy video guide step by step. You need to download Power Data Recovery Software. Click on following link and download this software and Install on your computer. 
    Download the program from here http://www.megaupload.com/?d=06J2M6G0

    You may also like below posts


    How to Register Avast Antivirus to Get Free License Key


    Lot of users ( me also) switched from AVG to Avast Free antivirus as AVG 2011 disappointed most of users by eating system resources and slowing down system performance. Avast 6released with Auto-Sandboxing technology including for free version users, though Avast Free Antivirus is free to use, you need to register it to get one year license key otherwise your antivirus will expire after 30 days.


    Registering Avast online is easy by entering your email address but you need to do this every time when you install Avast.


    Though requesting registration key by filling a form is recommended for offline users, its always good to have Avast license key available (even for online users) with you to enter and activate it for one year when a case of reinstall is required.

    Registering Avast to get One year free license key


    1. Visit Avast Free Antivirus registration page, fill out the page by entering your email address and other mandatory details


    2. After filling your details Click “Register free license”, you get a message that “registration was successful” license key will be send to your email address with in 24 hours after the registration.


    3. When you get license key in your email address, copy it Open Avast User interface click “Maintenance” on the left side of screen to expand and click “Registration” click Insert the license key” shown at the bottom of the screen and enter it to get one year free protection from Avast.


    Friday, November 11, 2011

    How to create a website


    Introduction

    There are lot of tutorials on net on how to create website, but this guide is for absolute beginners who want to create their own simple site with few pages.
    To create a website you need 3 things

    Domain name or Web address (eg: This site's web address is www.shaplus.com )
    Web space or the hard disk space on any web server where your website files will reside.
    Website files- This is the actual pages of your site which has to be uploaded to your web space

    Step 1 - Domain Name

    Domain name or site's web address is the important part of a site. For each top level domains( like .com, .net, .in, .us etc) there are authorized registrars through which domain can be registered for required number of years(minimum 1 year to max 10 years). For common top level domains like (.com . org, .net ) the authorized registrars can be found in this country wise list http://www.internic.net/origin.html . So first you need to find the registrar from where you need to register the domain. If you prefer local payments options like bank check you may have to choose a registrar from your country. Pricing vary a little between registrars and it is usually less than $15 USD/year . After you find the registrar, you need to search for a domain name for your site which is not yet registered. Once decided you can register and make the payment to have the domain registered in your name.

    Registering a domain means you get control of the domain but it does not give you any web space to host your site. You have to get the web space separately and then link your domain name to the web space. How to link domain with you web hosting ?When registering a domain name you also get a domain control panel from the registrar website. In this control panel, you can point your domain to any web hosting by providing the nameserver address of the web host. (usually the name server address will be like ns1.hostingprovider.com, ns2.hostingprovider.com ) . After you enter your name server address of your hosting into domain control panel, it may take few hours (maximum 48 hours)  for the actual pointing from your domain to web hosting to work. This is the time taken for data from each registrar to get propagated across domain name servers across the world.

    Important : it is always recommended that you register the domain with any authorized registrars for that domain. Some hosting companies give free domain with their hosting plans but your control of the domain will be as long as you host with them. So in the future if you decide to host with another host you will loose your domain also.

    About free sub domains : In case you are not ready to go for a paid domain now (like yoursitename.com), to get a quick start on website creation, you can opt for sub domains which are offered free by many sites. Sub domain sites will have address of the type (yoursitename.FreeSubDomainProvider.com). One free such sub domain provided is www.co.cc, they provide free addresses like yoursitename.co.cc (there are both free and paid subdomains at co.cc).

    Step 2 - Web hosting

    Next step is to signup for web hosting from any web hosting providers. There are paid as well as free web hosting available. When you signup for a web hosting plan you usually get these details

    FTP login details for uploading files to your web space
    Name server details (explained above in the domain step)
    hosting control panel : displays details about your hosting like disk space, bandwidth etc and various other details.
    There is lot of web hosting providers and it can be confusing to choose the ideal host. When choosing web hosting you will come across these terms

    Web space : expressed in MB/GB/TB is the hard disk space allotted to your hosting
    Bandwidth : it is the traffic allowed per month. It is also mentioned in MB/GB/TB
    Guaranteed Uptime : it is percentage of time that the hosting provider give you guarantee that the website will be up and working. It is expressed as 99%, 98% etc.
    Hosting platform : Windows, Linux etc If you are creating a basic HTML website, then Linux hosting would be enough, as it is cheaper compared to Windows hosting
    scripting/ languages supported : PHP/Perl/Java etc. ( you need not worry about these if your site is basic html )
    You can either choose a paid web hosting provider or use a free hosting provider like www.awardspace.com . Freehosting do have limitations like limit on file size, bandwdith etc but it is ideal for those learning to create sites and till you find a suitable paid hosting.


    This site is hosted with Hostgator from Septemper 2007 onwards. You can try hostgator hosting for only $0.01 USD for first month using hostgator coupon code .

    Step 3 - Developing your website

    Now that you have the domain and web space required for your website, next step is to create actual files of your website and upload it to your web space.

    First you have to create the site in a local folder in your pc . If you are not a designer, you need not worry about designing the pages, you can find lot of free templates in sited like www.oswd.org or www.openwebdesign.org . Just find the suitable template and edit the template in any text editor(like notepad) to create the pages of your site.

    First page to create in your site would be the index page ( index.htm) , this would be the default page, which means the page that is displayed when only your website address is typed in browser. All other pages of your site are linked from this index page.  You may need to know the basic structure of a html file , text formating tags and other html tags.

    Once you have the index.htm of your site you can copy and rename it to create other pages of your site and then change the contents of each pages. To test the site you created, open the local index.htm in your browser and check it is working ok.

    Once the site is ready locally in your pc, you need to upload the contents to the web folder which your hosting provider has given. One free ftp software is filezilla.
    See these tutorials on how to use filezilla to upload the files
    http://www.velnetsupport.co.uk/parrots/FTP/Filezilla/
    or http://www.montgomerycollege.edu/webinfo/filezilla.html

    Thursday, November 10, 2011

    Install Windows XP from USB Flash/Pen Drive

    You might have installed Vista, Windows 7 from your USB flash drive. But if you want to install


    usb-driveWindows  XP from  USB flash drive then you should face some problem because the Windows XP does not have the feature of booting from a USB flash drive. But you can still install windows XP from  USB flash drive. This becomes very useful if your CD/DVD ROM is not working properly.
    Tip: Fix USb problems
    Update: Create multiboot USB drive to install both Windows XP and Windows 7.
    Actually, the installation CD of XP is a bootable cd. When you insert the disk in your CD/DVD ROM then the machine detects that it is a bootable cd and prompts for “Press any key to boot from cd”. By then you can format your hard disk,make partitions in it and over all then you can  install Windows XP also Vista and Windows 7 in your system. The same task you can perform with your USB flash drive. But generally it is not easy to make a bootable USB flash drive for XP. I shall discuss the process in two parts. The first process has been discussed in this post and the second process is discussed in  Install Windows XP From USB Flash Drive Part-II. I refer to follow the Part-II version. Here is the link of Part-II.

    How to install Windows XP from USB flash drive Part-I

    At first download the softwareWin to Flash . It does not need the installation. After running the setup file the following screen will appear.
    install-xp-from-usb-flash-drive-1
    From Task tab you can chose your task.
    install-xp-from-usb-flash-drive-2
    After choosing task press next .
    install-xp-from-usb-flash-drive-3
    Select the source path of the windows installation disk or copy and then the path of your USB flash drive.
    install-xp-from-usb-flash-drive-4
    Now the exact bootable copy will be made in the USB Flash drive.
    You can now install Windows XP from Flash drive.It is pretty easy method to install Windows XP from your Usb flash drive.If any problem arises then contact us.You can also manually build your USB flash drive enabled for installing XP in it.
    But that process is quite complex and so I recommend the process Install Windows XP from USB Flash Drive part-II. Any question or suggestion is always welcome.

    Tuesday, November 8, 2011

    Top 5 tips for buying a new computer


    Looking to avoid an expensive mistake? Cnet.com's Technology Editor Brian Cooley shares smart, practical advice to pick the best computer for your needs: 
    Get info from the three sources Editor's reviews, user opinions and manufacturers information — each has a different perspective.  Editors are going to have approached the product methodically and without bias if they are from an independent source like CNET.com.  Users will have lived with the product for the longest time and in the most diverse ways, which can reveal flaws or benefits that don't become apparent in short-term lab reviews. 
    And Manufacturers will have a unique concept of how they intended the product to be used and what makes it stand out.  Armed with these three perspectives you can feel pretty well-armed to figure out if the computer — or any consumer electronics product — is the right one for you.
    Make more RAM (random access memory) your main priority with any PC

    CPU speed and hard drive space are usually OK, memory is what's often skimpy on a new machine.   All too often what is perceived by users as their computer being too slow is actually not the CPU speed but the amount of memory.  When a computer has too little memory, it doesn't tell you, it just starts using part of the its hard drive space as a poor form of additional memory known as swap space or virtual memory.  It's a clunky, slow way for a computer to run but it at least keeps things going.  Much better is to give a computer the RAM it needs, 2GB at least if you want to run any of the latest operating systems with all their features.
    Consider 3GB if you can afford it because there's almost no such thing as too much RAM and the sweet spot for RAM for most users is somewhere between 2GB and 4GB if they are running Windows Vista with all the bells & whistles enabled.
    And of course check the brightness of the monitor.  Laptops are often used in brightly lit areas where ambient lighting it not idea, so make sure you have a bright display and one that seems large enough to your eyes.Shop for a laptop online and in store You need to test drive the keyboard, mouse and monitor since they are integrated.   You can always change the monitor, keyboard and mouse on a desktop PC but not on a laptop unless you have it tethered to a desk.  Check the keyboard for good key action — the amount of travel from top to bottom of a key press; more usually feels better.  Laptops use many different kinds of mouse pointing devices so make sure you like the one your new laptop uses.  Or at least find out if you hate it and should buy a travel mouse right away.
    Take advantage of weekly store specials
    Computers are largely commodities, so chase a low price point aggressively.   There are new models of computers coming on the market every few weeks and frankly they often differ very little in any meaningful way.  So take advantage of the fact that the retailer wants to move the "old stock" by cutting prices of the remaining units in inventory.  They also have other incentives for offering special price cuts, like special promotions from the PC manufacturer.  The bottom line:  There is usually nothing "wrong" with a machine that is being blown out cheaply since computers are very mature and not subject to dramatic technology improvements month to month.  Shop for price somewhere in the range of $500 - $750 and you could almost go to the store blindfolded and still make a good choice.
    Don't get hung up on parts
    Computers are largely made from the same components.  Rather, shop for a brand that will have good customer support.   Computers are often considered commodity products since they all use pretty much the same guts, with just a different case and brand name on the outside.   Businesses have known this for years and buy whatever brand gives them the best price when they deploy thousands of machines across an enterprise. 
    So buy like the pros and don't get hung up on some concept that a certain brand of PC is necessarily faster or better built than another.  Instead you might want to ask friends and other users online what kind of product support experience they have had with a given brand of computer.  That's where PC brands can differ rather substantially.  Check the warranty, support section of web site, and even call their toll free support number with a test question to see what the people are like on the other end.
    For more tech information and tips, visit Cnet.com.