Showing posts with label best tips. Show all posts

Wednesday, May 18, 2016

Top best 10 Windows 8 tips and tricks


Update to Windows 8.1

Microsoft has released Windows 8.1, which is a free upgrade for anyone running Windows 8. This update addresses many of the problems users have had with Windows 8 and also adds a Start button. Visit Microsoft's Windows 8.1 page for the update.

Customize your tiles

Windows 8 tiles
Make the most of your Windows Start screen tiles by adjusting the sizes, where they are located, and what is listed.

  • Move any tile by clicking and dragging the tile. While moving a tile, if you need a larger view of the Start screen move the tile towards the top or bottom of the screen to zoom out.
  • Use your mouse wheel to scroll left-to-right through your tiles.
  • Any Desktop shortcut or program can be pinned to the Start screen by right-clicking the icon and choosing Pin to Start.
  • In the bottom right-hand corner of the start screen is a magnifying glass with tiles, click this icon to get a zoomed out view of your Start screen. In this view, if you right-click on a group of tiles you'll be given the option to name group, which can be useful if you have a group of related tiles (e.g. games). In this view, you can also click and drag a group to organize your tile groups.
  • Create a new speed bump between tile groups by moving a tile to a speed bump.
  • Resize any User tile or Live tile by right-clicking the tile and choosing resize.
  • If there is a tile you want on your Taskbar, right-click the tile and choose Pin to taskbar.
  • Show admin applications on the Start screen by clicking Settings in Charms, click Settings, and change the Show administrative tools from No to Yes.
  • In Internet Explorer 10, you can also pin any of your favorite web pages to your Start Screen.

Windows 8 keyboard shortcuts

Knowing at least some of the Windows 8 keyboard shortcuts helps make your Windows 8 experience much more enjoyable. Try to memorize these top Windows 8 shortcut keys.
  • Press the Windows key to open the Start screen or switch to the Desktop (if open).
  • Press the Windows key + D opens the Windows Desktop.
  • Press the Windows key + . to pin and unpin Windows apps on the side of the screen.
  • Press the Windows key + X to open the power user menu, which gives you access to many of the features most power users would want (e.g. Device Manager and Command Prompt).
  • Press the Windows key + C to open the Charms.
  • Press the Windows key + I to open the Settings, which is the same Settings found in Charms.
  • Press and hold the Windows key + Tab to show open apps.
  • Press the Windows key + Print screen to create a screen shot, which is automatically saved into your My Pictures folder.
See our Windows shortcuts page for a full listing of all Windows shortcuts.

Know your hot corners

The corners on your screen are hot corners and give you access to different Windows features. Below, is a brief explanation of each of these corners.
Bottom Left-hand corner
The bottom left-hand hot corner of the screen allows you to access the Start screen. If you're in the Start screen and have the Desktop open, this corner opens the Desktop from the Start screen.
Tip: Right-clicking in the left hand corner opens the power user menu.
Top-left corner of the screen
Moving the mouse to the top-left corner and then down displays all the apps running on the computer. Clicking and dragging any of these apps to the left or right-hand side of the screen will snap that app to that side of the screen. Each of these open app icons can also be right-clicked to close or snap.
Right-hand side of the screen
On the full right-hand side of the screen will be given access to the Windows Charms.

Taking advantage of search

The Search in Windows 8 has been significantly improved when compared to all previous versions of Windows. To search for a file or run a program in Windows 8 from the Start screen just start typing what you're trying to find or want to run.
As you begin typing, the results will start appearing on the left-hand side. The Search also supports limiting the search to apps such as Finance, People, Maps, Photos, Mail, Music, Videos, Weather, and much more. If what you are searching for is not a file or program, click on the app you want to use as the search. For example, if you were searching for "New York" and selected the Weather App you would be shown the weather in New York, NY.
By default, Search organizes the available Apps by how frequently they are used and then in alphabetical order. If you want to keep your favorite app at the top of the Search list, right-click the app and choose Pin. Pinning the app will lock it in place regardless of how often it is used. If there is an app you don't want (e.g. Finance) you can turn on and off any of the search apps through the PC settings, which is found under the Settings in the Charms.
Bonus tip: The Search is also found through Charms and can also be opened by pressing Windows key + F.

Running two apps side by side

Any app can be pinned to the left or right-hand side of the screen. For example, open the People app and then press the Windows Key + . (period) to move that app to the right-hand side of the screen, pressing the same keys again will move it to the left-hand side, and pressing the same keys again makes it full screen. While an app is pinned, any other app or program can be opened and loaded into the available space on the screen. For example, in the picture below, we've opened a browser window and have the People app running to monitor our social networks.
Windows 8 People
Any open app can also be pinned using your mouse by clicking at the top of the tile and dragging it to the left or right-hand side of the screen.
Bonus tip: The Desktop can also be pinned to the left or right-hand side of the screen.
Note: For snap to work properly your resolution must be at least 1,366 x 768.

Windows 8 Task Manager

The Windows 8 Task Manager has been significantly improved over previous versions of Windows. Some of the changes include a total percent usage of your Processes, improved Performance graphs, a Startup tab to see startup processes, and the App history tab (as shown below) for total resources an app. Press Ctrl + Shift + Esc to start exploring the new Task Manager.
Windows 8 Task Manager

Use a picture password to log into your computer

Windows 8 includes a new feature called Picture password, which allows you to authenticate with the computer using a series of gestures that include circles, straight lines, and taps. Enable this feature if you want a new way to access your computer or have a hard time with passwords.
  1. Open the Windows Charms.
  2. Click Settings and then More PC settings
  3. In the PC settings window click Users and then select Create a picture password
Bonus tip: A four digit pin password can also be created and used to access your computer.

Take advantage of Windows 8 apps

Windows 8 comes included with several apps to help you get the most from your computer. Below are just a few of the included apps.
People
Microsoft touts the People feature in Windows 8 because they understand how many people are using social networks today. In the People feature you'll be able to connect your Windows computer to all the major social networks including FacebookLinkedIn, and Twitter. Once connected, you can pin the people app and monitor your social network (as shown below), use People in Search to find people, and get an overview of what is happening in all your social networks.
Windows 8 People
Reader
The Reader app gives you PDF support right out of the box.
SkyDrive
The SkyDrive app gives you access to the Microsoft cloud service for storing photos, documents, and other files in a cloud and access or share those files easier.
Store
Take advantage of the Windows Store and install one or more of the thousands of available apps designed for Windows 8. The Store is found in the Start screen, or use Search to search the Store app for any apps that you are trying to find.

Know the answers to common questions

Windows 8 is the biggest change to Microsoft Windows since the introduction of Windows 95, which was released all the way back in 1995. Since so many people have grown up with Windows, it can be difficult to transition to a new way of doing things. Below, is a short list of the most common questions previous Windows users have.

Know the Jargon

Knowing all the new jargon introduced with Windows 8 help improve your familiarity with Windows 8 and make it a more enjoyable experience. Below, are just a few links to the most commonly used Windows 8 terms.
  • Charms
  • Lock screen
  • Picture password
  • Pin
  • Power User Task Menu
  • Snapped app
  • Speed bump
  • Start screen
  • Tile, User Tile, and Live Tile
  • Windows Store 
Source: Computer Hope

Monday, April 11, 2016

How To Increase Wi-Fi Signal Strength on Laptop

Today in this blog post “How to use MyPublicWifi” post my blog visitor asks question that gives me suggestions to improve or boost the strength of Wi-Fi signals on Laptop, so I decide that I need to write post on how to increase Wi-Fi signal strength on laptop or my laptop Wi-Fi signals are very poor how to improve it.


Nowadays all Laptop’s Wi-Fi is stronger than smartphone’s Wi-Fi radio. So, you will get better Wi-Fi signal and speed on Laptop. However, if the Wi-Fi network is really very weak, I recommend you to go near to the Wi-Fi network. If you are at the best place, and still not getting good results then follow these tricks and boost Wi-Fi signals. These tricks will surely boost your Wi-Fi Signal on Laptop.

Tip No. 1. Upgrade Your Wi-Fi Router

Recent laptops are using 802.11g or 802.11n Wi-Fi circuitry to efficiently utilize Wi-Fi networks. If your router is an 802.11b device, upgrade it so that it can match the speed of your laptop.

Tip No. 2. Use Wi-Fi Signal Repeater

To add more strength to your Wi-Fi signal, use Wi-Fi repeater (also called wireless amplifier or range expander). It get Wi-Fi signals from Wi-Fi routers and then retransmits it or throw it. Place your Wi-Fi repeater somewhere near the edge of existing signal to make the best use of the device. It will then rebroadcast the signal, covering other areas for the connection.

Tip No. 3. Replace Standard Router Antenna with Omnidirectional

The advantage of Omni antenna is to provide a signal in all direction. The directional signal allows you to target the location where you want to the signal.

Tip No. 4. Install External Wi-Fi Adaptor

Laptops adapters are good but external Wi-Fi adapters are great. If your laptop is old and so you’re not getting better Wi-Fi signal, disable built-in Wi-Fi and installing an external Wi-Fi adapter. External Wi-Fi Adapters have a large antenna and they use up-to-date technologies which can drastically improve Wi-Fi signal for your laptop.

Tip No. 5. Reposition Wi-Fi router

If possible, try to place your router at the center location, prefer a place where thick walls or obstructing furniture can’t congest your signal. Also, avoid placing your router or access point near to any metal surface, electronics that use signals (like Microwave, remote control doors, etc.). They interfere with a signal broadcaster.

Tip No. 6. Disable Network Hogs

Use task manager of any other program to check which apps are running in the background and using a network. Disable unused applications out of it so that your network speed and laptop’s performance both can be the boost.

Wednesday, August 22, 2012

Format USB Disk in DOS

Many times people ask this question "I can't format my USB or Flash Drive in Windows, how to I format my USB or 16GB USB or Flash Memory or Memory Card or SD Card in MS DOS or DOS"
If you find this question answer, then you come on correct place and follow these step, very simple.

Step 1: Insert your USB or Flash Memory in computer.
Step 2: Double click on My Computer icon at Desktop
Step 3: Note the USB or Removable Disk Portion name and Letter (i.e Memory Card (H)).
Step 4: Click on Start menu button > Run and type "cmd" press Enter keyboard button.
Step 5: Now you see a black window called DOS Promote.
Step 6: Type this command "format H:" and press Enter keyboard key. H is your USB driver name latter, it depend upon your computer.
Step 7: When you press Enter key, computer ask you question in yes or no (Y/N), you must type Y and press Enter key.

Now Format process is start and percentage increase continually, when it become to 100%, it mean your USB drive completely formatted.
For more detail watch this video.


If you have any suggestion or any question, please give comments in below comments form.
We respect your suggestion and waiting for your response.

Reference: ThinkBeyondWindow

Saturday, August 18, 2012

Google Tips "zerg rush"

First of all open Google Search Engine website www.google.com
In Google search box type "zerg rush" and press enter key.
Now see the magic of Google as below image.


Finally, it become like following image.


If you like this Google Tip then give your comments as feedback.


Thursday, August 2, 2012

Ammyy Remote Desktop Software Free

You can easily share a remote desktop or control a server over the Internet with Ammyy Admin.
There is no matter where you are, Ammyy Admin makes it safe and easy to quickly access a remote desktop within a few seconds.


System Administration
remote desktop connection for system administration
You can manage network computers and servers remotely without complicated NAT settings adjustments or Firewall problems. Assist your colleagues with remote access software and be confident all the transmitted data is reliably secured. Using Ammyy Admin as a tool for remote desktop connection and control is the best way to save time and money.

Remote office
remote desktop sharing in remote office
You will have quick and easy access to your remote office PC desktop via the Internet from anywhere, at any time. Remote desktop access lets you retrieve necessary documents and files from your work PC or activate specific software installed on the office computer. Ammyy Admin is also a perfect solution for enabling employees to work offsite from a remote location.

On-line presentations/distance education
free remote desktop access for webinars
With Ammyy Admin it's easy to arrange on-line presentations or hold virtual classes for distance education. You can host your presentation featuring class materials right in the remote desktops of meeting participants or students in the virtual classroom, communicating with them via real-time voice chat.

No installation required
To start remote desktop control session with Ammyy Admin you don't have to download and install massive remote desktop software which brings dozens of files and records to user's and system folders or system registry.
All you have to do is to download a tiny (0.5 Mb) Ammyy Admin exe file, start it and enter a computer ID which you want to connect to. It's really the simplest way to establish a connection to a remote PC avoiding tedious settings adjustments. It will take no longer than 20 seconds from the moment you download Ammyy Admin to the moment of the first remote session launch

Built-in voice chat and file manager
You can use Ammyy Admin not only as a tool for remote desktop connections and control but also as a free tool for voice communication with your relatives and partners over the Internet. Moreover Ammyy Admin offers a convenient file manager which makes it easy and quick to retrieve files from remote PC.

Control of unattended computers
Ammyy Admin allows its users to administer a remote unattended server or PC with the use of Ammyy Admin Service feature. This includes option to restart computer remotely, log in/log off or switch users. Present feature is the most actual among system administrators.

For download this software Click Here
For more help and information please watch this video


Source: Ammyy

Tuesday, July 31, 2012

How to use MyPublickWifi


Many users ask these questions,
How I access internet from my Laptop that is connected with Internet and my Phone is Wifi enable.
How I create Wifi hotspot in my Laptop or Computer.
How I use my Laptop or Computer with WLan as WiFi Access Point.
These all question answer is explained in following method.

Requirement:

  • Wireless Card for PC or Wifi enable Laptop.
  • MyPublicWiFi Software (Click Here to download)

Step 1: Download MyPublicWifi
Step 2: Install MyPublicWifi in your PC or Laptop.
Step 3: If your wifi or WLan is disable, then Enable it
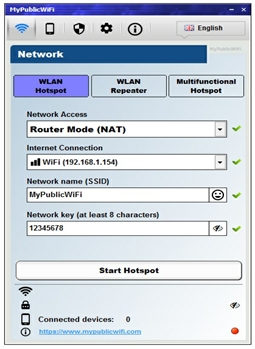
Step 4: First Start MyPublicWifi and Configure as you see in Following Picture.


Step 5: Now Click on "Set up and Start Hotspot". Now your MyPublicWifi or Virtual Wifi is active.

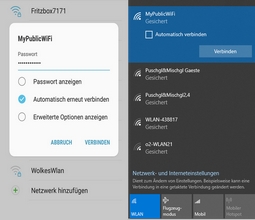
You can connect your mobile phone or Laptop with MyPublicWifi and access the internet or network services.
If you want to Stop MyPublicWifi, then Click on "Stop Hotspot" and your Virtual Wifi is Stop.
If you have any difficulty or any problem, then tells us through below comments form.

For more detail and information please watch this video or visit official website.


Monday, July 30, 2012

Use Your Android Phone as a Wi-Fi Hotspot for Free


Android: The Wi-Fi hotspot feature on Android phones lets you use your mobile data on multiple computers or tablets at once. The only problem is a lot of carriers have restrictions to prevent you from sharing your mobile data (which you're already paying for) for free. Computerworld posts a couple of workarounds.
First, you should know that, as with other kinds of tethering, your carrier may not be too happy with you going around their special Wi-Fi hotspot plans, and you can end up pissing them off and being charged extra (or in extreme cases, having your contract canceled). Also, these workarounds might not apply to every wireless carrier or device (it doesn't for me on T-Mobile with a Samsung Galaxy S2, but some commenters on Computerworld vouch for the method).

That said, if you only plan on using this occasionally and are willing to take the risk, here's how to get the hotspot functionality working:

Install a third-party power widget app. Computerworld suggests Extended Controls ($0.99), but you can try a free one like previously mentioned Elixir 2
Use the widget app to add a widget to your homescreen that toggles your hotspot Wi-Fi on or off.
Turn on the Wi-Fi hotspot
Pretty simple! Computerworld says that this workaround activates Android's built-in hotspot functionality, bypassing any menu-level modifications.

An alternative is to use a free app called FoxFi. It doesn't work with Android 4.1, though, and some carriers are blocking it from being downloaded, but you may be able to install it from an alternate location or with the QR code in the Play store.

If this trick works for you or you have any other suggestions, let us know in the comments below.

Source: LifeHacker

Friday, July 27, 2012

How to Forward Facebook chat to other friends.


Our mostly friend always ask that how we share or forward Facebook chat with other friends.
Sorry to say that there is no option to forward Facebook chat or message to other friends, in past Facebook had this option but now days there is no option to forward chat.
Only one method we can use that is Copy and Paste. Just copy your friend conversation and past in other friend chat box.

If you have any difficulty or any problem then tell us through below comments form.

Tuesday, July 24, 2012

Create a Free Logo for your website or blog


In this video you learn how to create a free logo for your website or blog. The free design software at www.LogoVictory.com allows you to create and download a logo for your website or blog, free using a template driven system. This video walks a user through the various tools of the design editor so that it is easy to use and create a logo. http://www.LogoVictory.com
You can add pictures, text and other shapes for best look of your logo.
How can we give it away for free? Simple, if you create a logo and download your jpeg for free, we are fine with that and thousands of people have already done it. But some people ask to create a profiessional .eps file for them from their design. They charge $50 for this. Other people ask her to put their logo on letterhead or signs or stickers. They like this as well. But the bottom line is simple, if you want a hassle-free logo at no cost, then use do-it-yourself system and have fun creating a great logo and have fun with it!

Monday, July 23, 2012

How to Recover Deleted Data from Memory Card Step by Step


How to Recover Deleted Data from Memory Card Step by Step
In this tutorial you learn step by step how to recover data from memory card that you ever accidentally deleted from your cameras memory card? Or pressed the Format button instead of delete button and wiped your card clean?
Searching on Google for recover data/photos from memory card, and you’ll find lot of programs out there for sale. Most people don’t mind paying to recover some important pictures and that’s why those programs exist.
However, there are also a lot of good open source / freeware apps out there that can usually get the job done. And that’s where the nice people at CONVAR come in – offering a program called PC Inspector Smart Recovery, which can recover lost pictures for free. What’s even better is that it’s extremely easy to use and works well (based on my tests).
Please note that after you’ve lost the picture, do not take any more pictures or write any data on your memory card, as writing new data to the card lowers your chances of recovering the picture. Also note, that recovering the picture is not 100% guaranteed, but there’s a good chance your picture will be recovered.


PC INSPECTOR Smart Recovery is a 100% free program, which can recover lost data from not only memory sticks, but also for any kind of memory device available nowadays. If you have deleted any kind of file, you can usually rely on PC INSPECTOR Smart Recovery to recreate and reconstruct the file again, with great accuracy.
PC INSPECTOR Smart Recovery runs on all Win 9x, ME, NT 4.0, XP and Windows 2000 systems and supports the following picture formats: .jpg, .amr, .tif, .bmp, .gif, Canon .crw , Fuji .raf , RICOH .raw, Olympus .orf (E-XX), Olympus .orf (C5050), Nokia 3gp, Kodak .dcr, Minolta .mrw, Nikon .nef (D1H/D1X), Nikon .nef (D2H/D2X), Nikon .nef (E5000/E5700), Sigma – Foveon .x3f, mp4, QuickTime .mov (Konica Minolta). Video files in .avi, QuickTime .mov format and audio files in .wav, .dss format can also be recovered.
Using the software is straightforward and doesn’t need a detailed explanation. Simply plug in your memory device, run the program, and you’re set. But if you really want a step by step instruction, here it is:
Step 1: Download PC INSPECTOR Smart Recovery. Click Here for download
Step 2: Connect your memory card, either by a little memory card reader, or hook your camera up to the PC via the data cable.
Step 3: Run PC INSPECTOR Smart Recovery.
Step 4: Select the drive which is the memory card. It should be the one that has just connected.
Step 5: Leave the format type as .JPG.
Step 6: Choose a destination for the recovered files.
Step 7: Press ‘Start’.


If you are able to recover the picture, but you can’t view it, you may want to perform a search on how to view damaged or corrupted files.
As a test, I deleted some pictures from my Sony digital camera and run PC Inspector to see if I could get them back. So far, it’s been able to recover the deleted pictures and videos as long as I don’t take any other pictures after the deletion.


You may also like


Wednesday, November 16, 2011

15 Best Tips for Windows 7

You have upgraded to Windows 7, love the new taskbar, and enjoy the power of using the cool Libraries feature.
But now you want more. You want the cool tips and tricks that make Windows 7 fun!
So here are the best ones to help you get the most out of your new OS. In this article, we will focus on the Windows 7 interface to get you started on the road to becoming a Windows 7 Power User. In Part 2, we will be looking at advanced tips for usability, performance, and security.

1. Use Keyboard Shortcuts

Using the mouse, you can drag-”˜n-dock windows to either side of the screen, or drag it to the top to maximize it. These keyboard shortcuts are even faster:
  • Win+Left Arrow and Win+Right Arrow dock the window to the left and right side of the screen
  • Win+Up Arrow and Win+Down Arrow maximize and restore/minimize
  • Win+M minimizes everything
  • Alt+Up, Alt+Left Arrow, Alt+Right Arrow navigate to parent folder, or browse Back and Forward through folders in Explorer
  • Win+Home minimizes/restores all open windows except the active window
  • Alt+Win+# accesses the Jump List of program number ‘#’ on the taskbar

2.Rearrange System Tray Icons

SystemTray
You can rearrange icons on the taskbar as you wish and start new (or switch to running) instances of the first ten taskbar programs using Win+1, Win+2, and so on. The cool thing is you can also rearrange system tray icons. Reorder them on the tray or move them outside or back in the tray. Take control of what you want to always keep an eye on, and from which apps you’ll require notifications.
Ads by Google

3. Access Jump Lists with the Left Mouse Button

Jump Lists usually show up when you right-click on a taskbar icon. However, they can also be accessed by holding the left mouse button and dragging upwards. If you’re using a laptop touchpad or a touch screen, this is convenient because you do not have to click any button to access a context menu.

4. Add Any Folder to Favorites

AddToFavorites
You can add any library or folder to the Favorites section in Windows Explorer. To add a folder, navigate to it in Explorer, right-click Favorites in the left navigation pane, and select Add current location to Favorites. Now you get quick access to your favorite folders in all File->Save As dialogs!

5. Pin Frequently Used Folders to the Taskbar

Right-click, drag, and pin your favorite folders to Windows Explorer on the taskbar. They will now show up in the Jump List when you right click on Explorer giving you quick access to your favorite folders.

6. Pin Control Panel to the Taskbar

PinControlPanel
You cannot pin the Control Panel to the taskbar via the Start Menu or by drag and drop. Open the Control Panel and right-click its taskbar icon to pin it to the taskbar. An advantage of this is that Control Panel’s Jump List allows quick access to recently used functions.

7. Create Keyboard Shortcuts for Programs

You can create keyboard shortcuts for any program in Windows 7. Right-click the program icon and select Properties. Select the Shortcut tab, click in Shortcut key, to set the keyboard shortcut for that program.
ProgramShortcutKey

8. Open Command Prompt in Any Folder

Like the command prompt? Miss the “˜Open Command Window Here’ Windows XP power toy? Press “˜Shift’ when right-clicking on a folder to get that option in the context menu. This also works on the desktop. No power toy required!
ExpandedContextMenu

9. View Expanded ‘Send To’ Menu

Press Shift when right-clicking on a folder to get an expanded Send To menu.

10. Adjust Screen Text with Clear Type

Use Clear Type Tuner for the best look on your LCD monitor or laptop screen. Run “˜cttune.exe‘ from the Start Menu search box, or go to the Control Panel Display applet, and select Adjust ClearType Text from the left.
ClearType Tuner

11. Get Exact Colors On Your Screen

If you are an artist or you work with colors, use the Calibrate Color option in the Control Panel Display applet or run dccw.exe from the Start Menu search box. You can adjust gamma, brightness, contrast, and color balance, ensuring that colors are displayed correctly on your screen.

12. Customize the Power Button

If you restart your computer more often than you shut it down, change the default Shutdown power button to Restart. Right-click on Start, select Properties, and choose the Power button action that you use the most.
StartMenuProperties

13. Customize Number of Items in Jump Lists & Start Menu

Right-click Start, select Properties, click Customize and choose the number of recent programs to be shown in the Start Menu and the number of items displayed in Jump Lists from the Start Menu Size section below.

14. Search Internet from the Start Menu

SearchInternetStartMenu
Enable Internet search from the Start Menu using your default browser. Run GPEDIT.MSC from the Start Menu search box to start the Group Policy Editor. In the left pane, go to User Configuration->Administrative Templates->Start Menu and Taskbar. In the right pane, right-click to Edit and Enable Add Search Internet link to Start Menu.
SearchInternet

15. Add Videos to Start Menu

Windows 7 does not place a link to your videos on the Start Menu by default. To add a link to your videos on the Start Menu, right-click Start, select Properties, click on Customize. In the Videos section at the bottom, choose Display as a link.
Add Videos

Tuesday, November 8, 2011

Top 5 tips for buying a new computer


Looking to avoid an expensive mistake? Cnet.com's Technology Editor Brian Cooley shares smart, practical advice to pick the best computer for your needs: 
Get info from the three sources Editor's reviews, user opinions and manufacturers information — each has a different perspective.  Editors are going to have approached the product methodically and without bias if they are from an independent source like CNET.com.  Users will have lived with the product for the longest time and in the most diverse ways, which can reveal flaws or benefits that don't become apparent in short-term lab reviews. 
And Manufacturers will have a unique concept of how they intended the product to be used and what makes it stand out.  Armed with these three perspectives you can feel pretty well-armed to figure out if the computer — or any consumer electronics product — is the right one for you.
Make more RAM (random access memory) your main priority with any PC

CPU speed and hard drive space are usually OK, memory is what's often skimpy on a new machine.   All too often what is perceived by users as their computer being too slow is actually not the CPU speed but the amount of memory.  When a computer has too little memory, it doesn't tell you, it just starts using part of the its hard drive space as a poor form of additional memory known as swap space or virtual memory.  It's a clunky, slow way for a computer to run but it at least keeps things going.  Much better is to give a computer the RAM it needs, 2GB at least if you want to run any of the latest operating systems with all their features.
Consider 3GB if you can afford it because there's almost no such thing as too much RAM and the sweet spot for RAM for most users is somewhere between 2GB and 4GB if they are running Windows Vista with all the bells & whistles enabled.
And of course check the brightness of the monitor.  Laptops are often used in brightly lit areas where ambient lighting it not idea, so make sure you have a bright display and one that seems large enough to your eyes.Shop for a laptop online and in store You need to test drive the keyboard, mouse and monitor since they are integrated.   You can always change the monitor, keyboard and mouse on a desktop PC but not on a laptop unless you have it tethered to a desk.  Check the keyboard for good key action — the amount of travel from top to bottom of a key press; more usually feels better.  Laptops use many different kinds of mouse pointing devices so make sure you like the one your new laptop uses.  Or at least find out if you hate it and should buy a travel mouse right away.
Take advantage of weekly store specials
Computers are largely commodities, so chase a low price point aggressively.   There are new models of computers coming on the market every few weeks and frankly they often differ very little in any meaningful way.  So take advantage of the fact that the retailer wants to move the "old stock" by cutting prices of the remaining units in inventory.  They also have other incentives for offering special price cuts, like special promotions from the PC manufacturer.  The bottom line:  There is usually nothing "wrong" with a machine that is being blown out cheaply since computers are very mature and not subject to dramatic technology improvements month to month.  Shop for price somewhere in the range of $500 - $750 and you could almost go to the store blindfolded and still make a good choice.
Don't get hung up on parts
Computers are largely made from the same components.  Rather, shop for a brand that will have good customer support.   Computers are often considered commodity products since they all use pretty much the same guts, with just a different case and brand name on the outside.   Businesses have known this for years and buy whatever brand gives them the best price when they deploy thousands of machines across an enterprise. 
So buy like the pros and don't get hung up on some concept that a certain brand of PC is necessarily faster or better built than another.  Instead you might want to ask friends and other users online what kind of product support experience they have had with a given brand of computer.  That's where PC brands can differ rather substantially.  Check the warranty, support section of web site, and even call their toll free support number with a test question to see what the people are like on the other end.
For more tech information and tips, visit Cnet.com.