Showing posts with label Networking. Show all posts

Wednesday, May 17, 2017

How to Enable USB Tethering from Android Mobile

Many Friends asking about that How I can use my mobile internet on my Computer through USB data cable, because my computer did not have wifi device
OR
I did not want to open wifi hotspot of my mobile other people use my phone internet.
So here is solution for that people who want to use Mobile Wifi Internet or Data Internet on computer / pc through USB Data cable.
In this way you can share the Android phone’s digital cellular connection or wifi connection is to connect the phone directly to a computer and activate the tethering feature. Not every Android phone has this capability.
Tethering is a solid way to provide Internet access to another gizmo, such as a laptop or a desktop computer. Follow these steps to set up Internet tethering:
1. Connect the phone to a computer or laptop by using the USB cable.
The best success with this operation is when the computer is a PC running Windows.
2. Open the Android Phone Settings.
3. Choose More, and then choose Tethering & Mobile Hotspot.
4. Place a check mark by the USB Tethering item.
Internet tethering is activated.
The other device should instantly recognize the phone as a “modem” with Internet access. Further configuration may be required, which depends on the computer using the tethered connection. For example, you may have to accept the installation of new software when prompted by Windows.
When tethering is active, a Tethering or Hotspot Active notification icon appears. Choose that notification to further configure tethering.
Unlike creating a Wi-Fi hotspot, you don’t need to disable the Wi-Fi radio to activate USB tethering.
Sharing the digital network connection incurs data usage charges against your cellular data plan. Be careful with your data usage when you’re sharing a connection.

Watch this video for more details


Source: dummies.com

Monday, April 11, 2016

How To Increase Wi-Fi Signal Strength on Laptop

Today in this blog post “How to use MyPublicWifi” post my blog visitor asks question that gives me suggestions to improve or boost the strength of Wi-Fi signals on Laptop, so I decide that I need to write post on how to increase Wi-Fi signal strength on laptop or my laptop Wi-Fi signals are very poor how to improve it.


Nowadays all Laptop’s Wi-Fi is stronger than smartphone’s Wi-Fi radio. So, you will get better Wi-Fi signal and speed on Laptop. However, if the Wi-Fi network is really very weak, I recommend you to go near to the Wi-Fi network. If you are at the best place, and still not getting good results then follow these tricks and boost Wi-Fi signals. These tricks will surely boost your Wi-Fi Signal on Laptop.

Tip No. 1. Upgrade Your Wi-Fi Router

Recent laptops are using 802.11g or 802.11n Wi-Fi circuitry to efficiently utilize Wi-Fi networks. If your router is an 802.11b device, upgrade it so that it can match the speed of your laptop.

Tip No. 2. Use Wi-Fi Signal Repeater

To add more strength to your Wi-Fi signal, use Wi-Fi repeater (also called wireless amplifier or range expander). It get Wi-Fi signals from Wi-Fi routers and then retransmits it or throw it. Place your Wi-Fi repeater somewhere near the edge of existing signal to make the best use of the device. It will then rebroadcast the signal, covering other areas for the connection.

Tip No. 3. Replace Standard Router Antenna with Omnidirectional

The advantage of Omni antenna is to provide a signal in all direction. The directional signal allows you to target the location where you want to the signal.

Tip No. 4. Install External Wi-Fi Adaptor

Laptops adapters are good but external Wi-Fi adapters are great. If your laptop is old and so you’re not getting better Wi-Fi signal, disable built-in Wi-Fi and installing an external Wi-Fi adapter. External Wi-Fi Adapters have a large antenna and they use up-to-date technologies which can drastically improve Wi-Fi signal for your laptop.

Tip No. 5. Reposition Wi-Fi router

If possible, try to place your router at the center location, prefer a place where thick walls or obstructing furniture can’t congest your signal. Also, avoid placing your router or access point near to any metal surface, electronics that use signals (like Microwave, remote control doors, etc.). They interfere with a signal broadcaster.

Tip No. 6. Disable Network Hogs

Use task manager of any other program to check which apps are running in the background and using a network. Disable unused applications out of it so that your network speed and laptop’s performance both can be the boost.

Friday, April 8, 2016

Connect to Another Computer Using Remote Access Software

Free Computer Tips

If you have Windows XP it has built in remote access software that helps you connect to a friends computer, by invitation, to help them by taking remote access control of their computer system. This means you could be in the USA and be helping your friend in Australia to find a solution to his or her computer problems. The technology to gain remote access to basically anyone's computer is available on most computer users start menu. I regularly give my friends computer support from the comfort of my own home.


What you need to use the Help and Support tool to gain remote access 


1. An broadband or cable internet connection. 
2. Windows Xp on both computers 
3. An email address or be signed into Windows 4. Live messenger. 

The easiest way to connect


It is very easy to connect two computers over the internet. One computer can take control and fix problems on the other computer. Following these steps to use the Help and support software that is built in to Windows.

1. Sign in to Windows Live Messenger and have your friend do the same thing. 
2. Go to the start menu and choose Help and Support (shown below) Just the computer user that wants to invite does this. 
3. The Help and Support Center will appear. 
4. Click on Invite a Friend to connect to your computer with Remote Assistance. Located under the Ask For Assistance menu. 
5. Then press Invite someone to help you. The window below will appear. 
6. Choose your friends name from the Windows Messenger contact list.
7. Click on Invite this person.
8. This will allow your friend to see your desktop. If they want to control your they must press the Take control button and the other person must agree by pressing ok..

Check out the Screenshots for this article at How to connect to another computer. This is what I see when I am in control of my friends computer...I can go on the internet or read their emails etc.. 

Reasons to use Windows remote help and support


--Your problem is so minor, you do not want to bother an IT support person.

--You cannot afford an It technician, and your know a computer whiz..

--You have already rang software support or your internet service provider and they could not help

--You constantly need desktop computer help and using remote access software is easy!!


Notes:

--If you close the Remote Assistance Window it will disconnect. And you will have to start your remote access again if you want to connect.

--Don't worry if it is a bit slow because that is normal. The speed of your remote access depends on your speed of both internet connections. 

--You can also connect using an email address. The invitatiSon is sent through email.
Source: ArticlesBase

Thursday, August 2, 2012

Ammyy Remote Desktop Software Free

You can easily share a remote desktop or control a server over the Internet with Ammyy Admin.
There is no matter where you are, Ammyy Admin makes it safe and easy to quickly access a remote desktop within a few seconds.


System Administration
remote desktop connection for system administration
You can manage network computers and servers remotely without complicated NAT settings adjustments or Firewall problems. Assist your colleagues with remote access software and be confident all the transmitted data is reliably secured. Using Ammyy Admin as a tool for remote desktop connection and control is the best way to save time and money.

Remote office
remote desktop sharing in remote office
You will have quick and easy access to your remote office PC desktop via the Internet from anywhere, at any time. Remote desktop access lets you retrieve necessary documents and files from your work PC or activate specific software installed on the office computer. Ammyy Admin is also a perfect solution for enabling employees to work offsite from a remote location.

On-line presentations/distance education
free remote desktop access for webinars
With Ammyy Admin it's easy to arrange on-line presentations or hold virtual classes for distance education. You can host your presentation featuring class materials right in the remote desktops of meeting participants or students in the virtual classroom, communicating with them via real-time voice chat.

No installation required
To start remote desktop control session with Ammyy Admin you don't have to download and install massive remote desktop software which brings dozens of files and records to user's and system folders or system registry.
All you have to do is to download a tiny (0.5 Mb) Ammyy Admin exe file, start it and enter a computer ID which you want to connect to. It's really the simplest way to establish a connection to a remote PC avoiding tedious settings adjustments. It will take no longer than 20 seconds from the moment you download Ammyy Admin to the moment of the first remote session launch

Built-in voice chat and file manager
You can use Ammyy Admin not only as a tool for remote desktop connections and control but also as a free tool for voice communication with your relatives and partners over the Internet. Moreover Ammyy Admin offers a convenient file manager which makes it easy and quick to retrieve files from remote PC.

Control of unattended computers
Ammyy Admin allows its users to administer a remote unattended server or PC with the use of Ammyy Admin Service feature. This includes option to restart computer remotely, log in/log off or switch users. Present feature is the most actual among system administrators.

For download this software Click Here
For more help and information please watch this video


Source: Ammyy

Friday, January 6, 2012

Set Windows 7 Static IP Address

There are some subtle changes between Windows 7 and either Windows XP and Windows Vista. Since I use virtualization (with VMWare Fusion) extensively to test environments, I seem to go through this drill too often. By the way, I upgraded to VMWare Fusion 3 before testing the production releases of Windows 7.
The easiest Windows 7 installation uses DHCP. That’s what I did before patching the OS, installing virus protection software, and installing a few tools and program. Then, I change from a dynamic IP to static IP address and add a meaningful name to the C:\Windows\System32\Drivers\etc\hosts file. Here are the steps to set a static IP address on Windows 7:
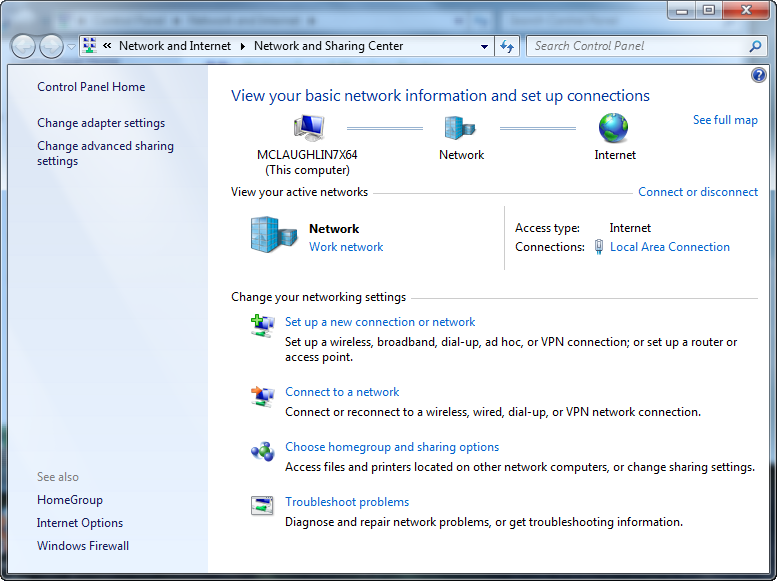
  1. Assuming that you’re in the Category view, you should navigate to the Control Panel, choose Network and Internet, and then click Network and Sharing Center. This is the window that you should see (click image to enlarge it):
NetworkSetup1
    Click the Local Area Connection to begin configuring your static IP address.
NetworkSetup2
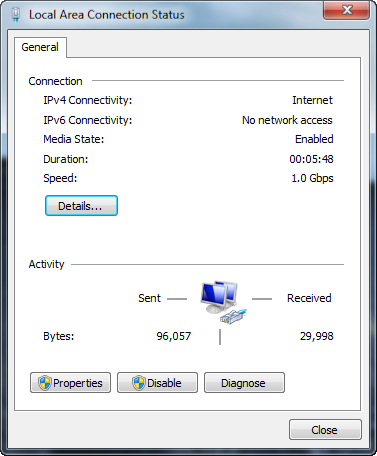
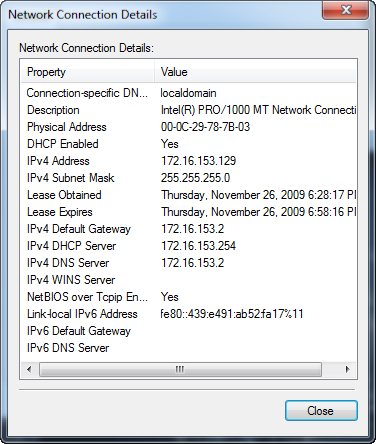
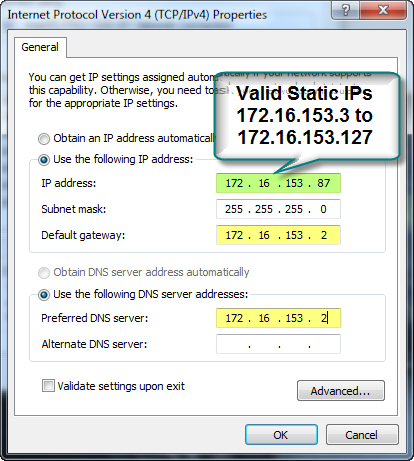
  1. From the Local Area Connection Status window, click the Details button to see your existing connection details (most likely DHCP). If you’re running this in VMWare Fusion, the 172.16.153.129 is the first IP address allocated. You should note the default gateway and DNS server IP address, which should always be 172.16.153.2. Click the Close button when you’ve made note of those IP addresses for subsequent steps.
NetworkSetup3
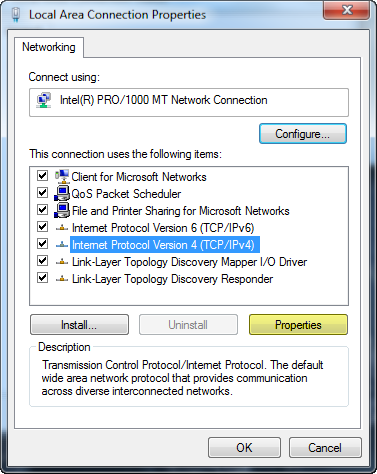
  1. Back at the Local Area Connection Status window, click the Properties button. It will show you the Local Area Connection Properties dialog. Click on the Internet Protocol Version 4 (TCP/IPv4) in the item box of the dialog window.
NetworkSetup4
  1. Click the Use the following IP address radio button and enter the appropriate values for your static IP address. The default gateway and DNS server are generally different but are the same when you’re using NAT addressing inside VMWare.
NetworkSetup5
You should be completed now. If you test the connection, Windows 7 raises and error but everything works after you reboot the operating system.